
Vehicle Management
Manage your car rental fleet — add, edit, and organize vehicles.
The Vehicle Management area is where you build and run your fleet: the Car List dashboard, vehicle taxonomies, branches, extra services, branch managers, and the full vehicle configuration wizard used to add or edit a car.
Car List Dashboard
Go to Car Rental → Car List to see the central dashboard for every vehicle in your fleet.

At the top of the page, quick stat cards give you an overview of your rental business:
- Total Cars — the total number of vehicles added to your fleet.
- Available — how many vehicles are currently available for booking.
- Currently Rented — the number of vehicles currently rented out.
- Daily Revenue — the total revenue generated for the current day.
Adding, Searching & Filtering Vehicles
Click + Add New Vehicle in the top-right corner to start the vehicle configuration wizard (covered in detail below). Use the Search cars… field to find a vehicle by name, and filter the list by Car Type, Fuel Type, or Year.
Each row of the vehicle table shows the title (thumbnail + name), type, fuel type, seating capacity, brand, year, publish status, and daily price. Quick-action icons let you View, Edit, Duplicate (copy a vehicle with all its settings — handy for adding similar vehicles quickly), or Delete a vehicle. Click Load More to display additional vehicles without leaving the page.
Best Practices
- Upload a high-quality featured image for every vehicle.
- Organize vehicles using accurate car types and fuel types.
- Keep rental prices up to date and regularly review vehicle availability.
- Use the duplicate option to quickly add similar vehicles, and delete unused listings to keep your fleet organized.
Vehicle Taxonomies
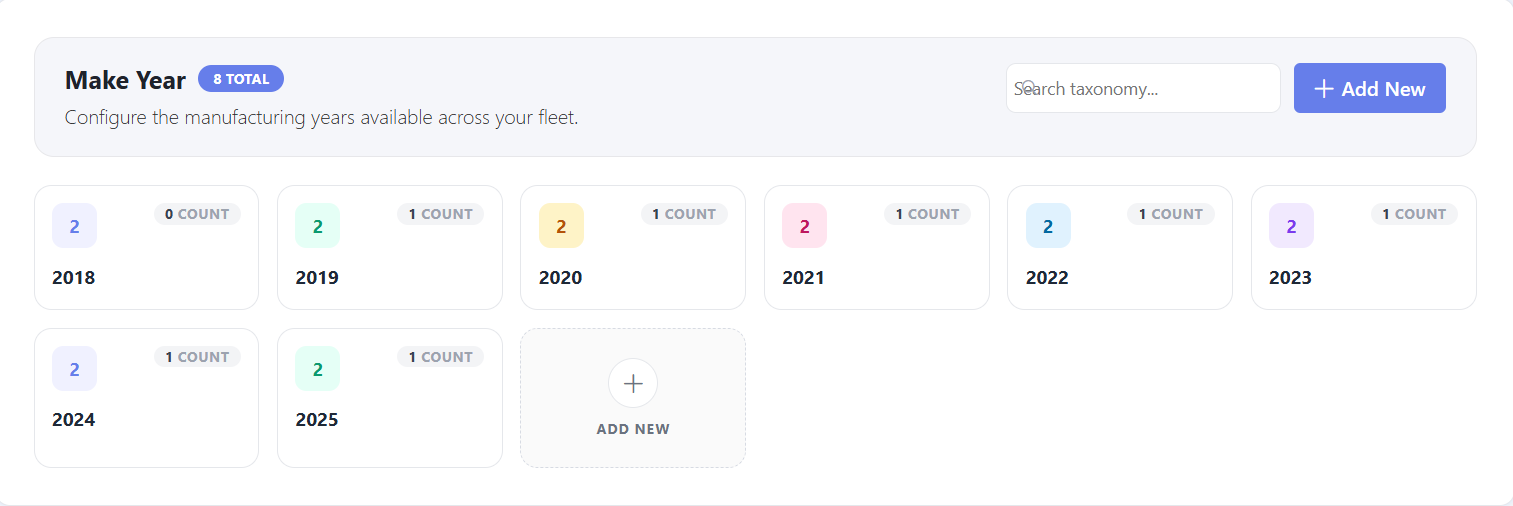
Before adding vehicles, set up the taxonomies your fleet will use. Each taxonomy screen shows a Total badge, a search field, and cards displaying the term name plus how many vehicles are assigned to it. Click + Add New (or the Add New card) to create a term with a name, URL-friendly slug, and optional description.
Car Types
Organize your fleet by body style — Sedan, SUV, Hatchback, Luxury Car, Microbus, and Pickup Truck are common examples. Proper categorization helps customers quickly find the type of vehicle they need when browsing your site.


Fuel Types
Manage the fuel options available across your fleet — Petrol, Diesel, Electric, Hybrid, CNG, and Octane.

Seating Capacity
Create seating options (e.g. 2 Seater, 5 Seater, 7 Seater) that customers can use to filter and book vehicles.


Car Brand
Manage the manufacturers in your inventory — BMW, Honda, Hyundai, Mercedes-Benz, Mitsubishi, Nissan, Toyota, and so on.

Make Year
Configure the manufacturing years available across your fleet so customers can filter vehicles by model year.
Vehicle Features
Vehicle Features are the standard and optional equipment tags you can assign to a vehicle — ABS Brakes, Air Conditioning, Airbags, Alloy Wheels, Android Auto / Apple CarPlay, Automatic Transmission, Bluetooth Connectivity, Child Seat Available, Cruise Control, Fog Lights, GPS Navigation, Keyless Entry, Leather Seats, Manual Transmission, Power Steering, Power Windows, Rear Camera, Sunroof, Tinted Windows, and USB Port. Click + Add Feature to create new global amenity tags.

Manage FAQs & Terms & Conditions (Global Library)
Before you can show FAQs or rental terms on a vehicle page, build the global question/answer and policy library that individual vehicles pick from.

Click + Add FAQ to write a new question and answer. Each row can be edited or deleted; deleting removes it everywhere it was assigned.

The Terms & Conditions library works the same way — click + Term & Condition to add a policy such as Age and License Requirements, Security Deposit, Fuel Policy, Mileage Limit, Damage Responsibility, Insurance Coverage, Late Return, Use Restrictions, Cancellation Policy, or Cleanliness and Smoking.
Note: both FAQs and Terms & Conditions can be enabled or disabled per vehicle from that vehicle’s own tabs while editing it, so only the most relevant items show on each vehicle page.
Branches
Manage all of your rental office locations under Car Rental → Branches. Each branch can have its own fleet of vehicles, making it easy to organize rentals across multiple locations.

Each branch is shown as a card with its name and the number of vehicles assigned. Click View Cars to see every vehicle assigned to that branch, the pencil icon to edit branch details, or the trash icon to delete a branch. Click + Add New Branch to register a new location.
Note: assign vehicles to their respective branches to help customers book from their preferred pickup location and simplify fleet management.
Extra Services
Extra Services are optional add-ons and complimentary offerings — GPS units, child seats, welcome drinks, hospitality items — that customers can select during the booking process.
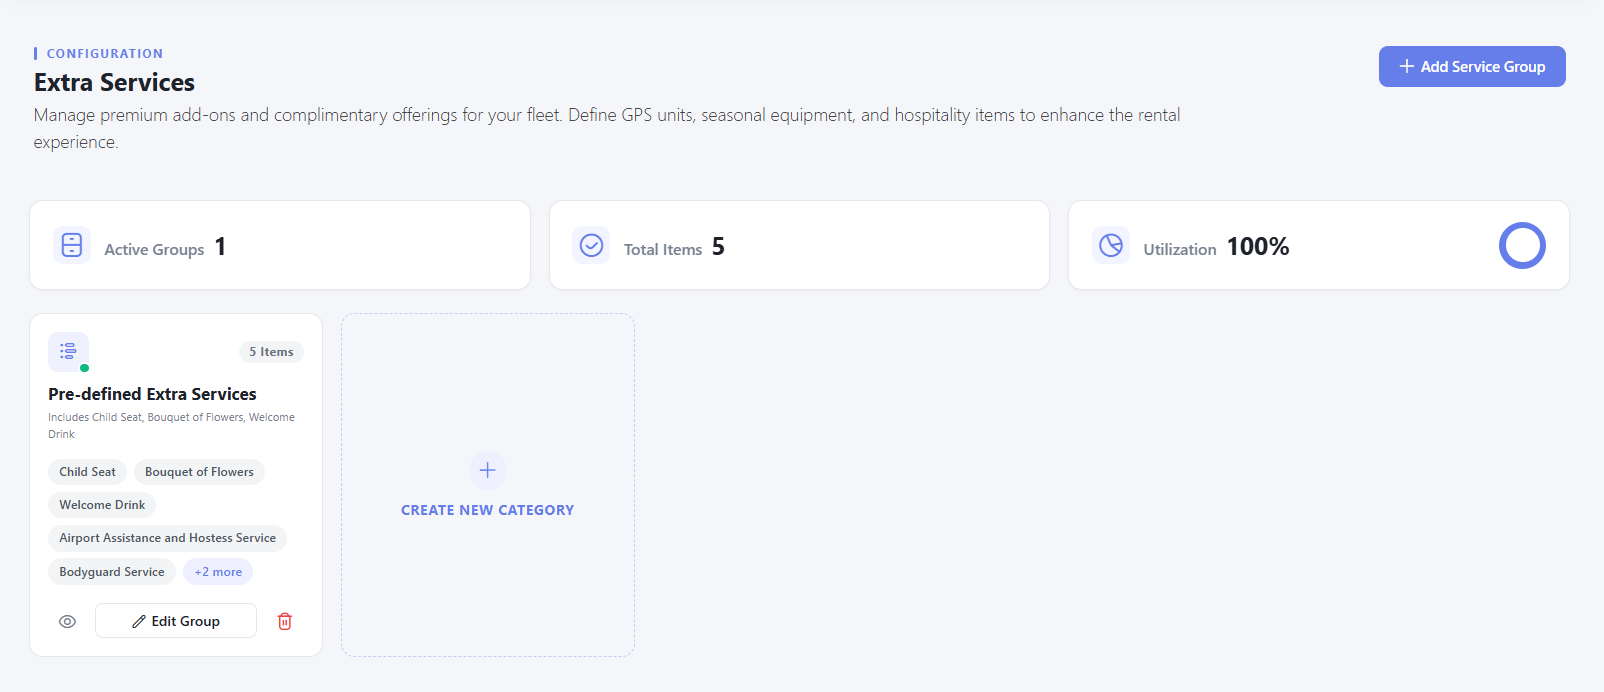
The dashboard summarizes Active Groups, Total Items, and Utilization. Each service group card shows its name, item count, and a preview of the services inside it. Click View to see all services in a group, Edit Group to modify it, or + Add Service Group / Create New Category to start a new group.
Branch Managers
Branch Managers let you delegate day-to-day operations to staff without giving them full admin access. Click + Add Branch Manager to create an account.

Fill in the manager’s First Name, Last Name, Email Address, Username, and a Temporary Password (or click Generate). Under Branch Access, select the branch or branches this manager is allowed to operate — a manager can be assigned to one or multiple branches. Click Create Branch Manager to save.
The Branch Managers directory lists every manager with their username, email, assigned branches, and an active/inactive status toggle, plus a delete action.

Tip: assigning specific branches restricts a manager’s dashboard view to only the vehicles, orders, and schedules relevant to their assigned locations.
Fleet Operation Schedule
Configure your fleet’s weekly service hours under Car Rental → Global Settings. These hours define when vehicles are available for dispatch and branch pickup across all active regions.

Use the Master Default Schedule row to set a Global Start and Global End time and click Apply To All Days to populate every weekday at once, then fine-tune individual days in the weekly grid — each day has its own Shift Start, Shift End, and an Off Day checkbox to mark it fully unavailable. The Off Dates Configuration panel lets you block specific calendar dates (holidays, maintenance windows) with + Add New Off Date.
Note: using Apply To All Days overwrites any custom hours you’ve already set for individual days, so re-adjust weekend hours afterward if needed.
Adding a New Vehicle
Click + Add New Vehicle from the Car List to open the vehicle configuration wizard. It’s a nine-step wizard covering everything about the vehicle:

- General Info
- Pricing
- Operation Area & Date Time
- Fee & Deposit
- FAQ
- Car Feature
- Term & Condition
- Driver and Branch Assignment
- Advanced
Pricing and Fee & Deposit are covered in full detail in Pricing & Availability. The rest are covered below.
1. General Info
Enter the vehicle’s basic details, description, and featured image.

- Vehicle Title — the name displayed on your website and throughout the plugin.
- Vehicle Description — a detailed description of the vehicle’s features and condition.
- Featured Image — the primary image shown on listing and details pages (Change Image / Remove).
- Enable/Disable Gallery — add multiple images so customers can view the vehicle from different angles.
This step also collects the vehicle’s specifications:

- Car Type, Fuel Type, Seating Capacity, Car Brand, Make Year — selected from the taxonomies you configured above.
- Maximum Passenger and Maximum Bag — the vehicle’s passenger and luggage capacity.
- Car Stock — the number of identical vehicles available for booking.
- Pickup Address Details — the address where customers can pick up the vehicle.
- Minimum Booking Day — the minimum number of rental days required (e.g. 2 for a minimum two-day rental).
2. Operation Area & Date Time
Controls the geographic availability and scheduling behavior for this specific vehicle — where it can be rented, recurring availability patterns, and lead-time constraints.

- Select Operation Area — click a location tag (Barishal, Chittagong, Dhaka, Khulna, Rajshahi, Sylhet) to make the vehicle available for pickup/drop-off in that zone; click again to remove it.
- Date Type — Repeated for recurring daily availability, or Particular to restrict the vehicle to specific fixed calendar dates.
- Repeated Start Date — the date the recurring schedule begins.
- Repeated after — the interval, in days, between availability windows (1 = available every consecutive day).
- Maximum Advanced Day Booking — the furthest into the future a customer can book (e.g. 60 days).
- Make Transport Available For 24 Hours — toggle round-the-clock pickups and returns on or off.
Tip: make sure the operation areas selected here match the branches assigned in the Driver and Branch Assignment step, to avoid location-mismatched bookings.
3. Extra Service Options
Attach add-on products or paid services — child seats, floral arrangements, welcome drinks, bodyguard service — directly to this vehicle’s booking form.

Toggle the feature on or off, choose a preset list from Select extra option to import a pre-configured global template, or add rows manually. Each row has an Icon, Name, Price, Pricing Type (Flat applies the fee once per booking regardless of duration), and Qty Box Type (Input Box lets customers request multiple units, e.g. 2 child seats).
4. Car Feature (Include / Exclude)
Highlight the specs and amenities this vehicle offers, and explicitly call out what it does not include. Features assigned here populate the Include/Exclude section on the vehicle’s frontend details page.

The Include Features panel lists amenities that ship with this vehicle (shown in blue on the frontend); the Exclude Features panel lists amenities explicitly not included (shown in red). Use the search box in either panel to quickly find a tag, and click + Add New Feature to create a new global amenity tag. Keep a feature out of both lists to leave it unmentioned.
5. FAQ
Choose which questions from your global FAQ library appear on this vehicle’s page.

Toggle Show FAQ Section on Frontend, then check the questions you want active for this vehicle. The status badge shows how many are currently selected out of the total available.
6. Term & Condition
Choose which rental policies from your global Terms & Conditions library apply to this vehicle, the same way as the FAQ step above.

Tip: keep essential policies such as Damage Responsibility and Insurance Coverage active so customers agree to your liability terms before booking, and match selected terms with the fees you’ve configured (e.g. enable the Security Deposit term whenever the Security Deposit fee is turned on).
7. Driver and Branch Assignment
Manage real-time location tracking across branches, and optionally attach a driver’s contact details to this vehicle.
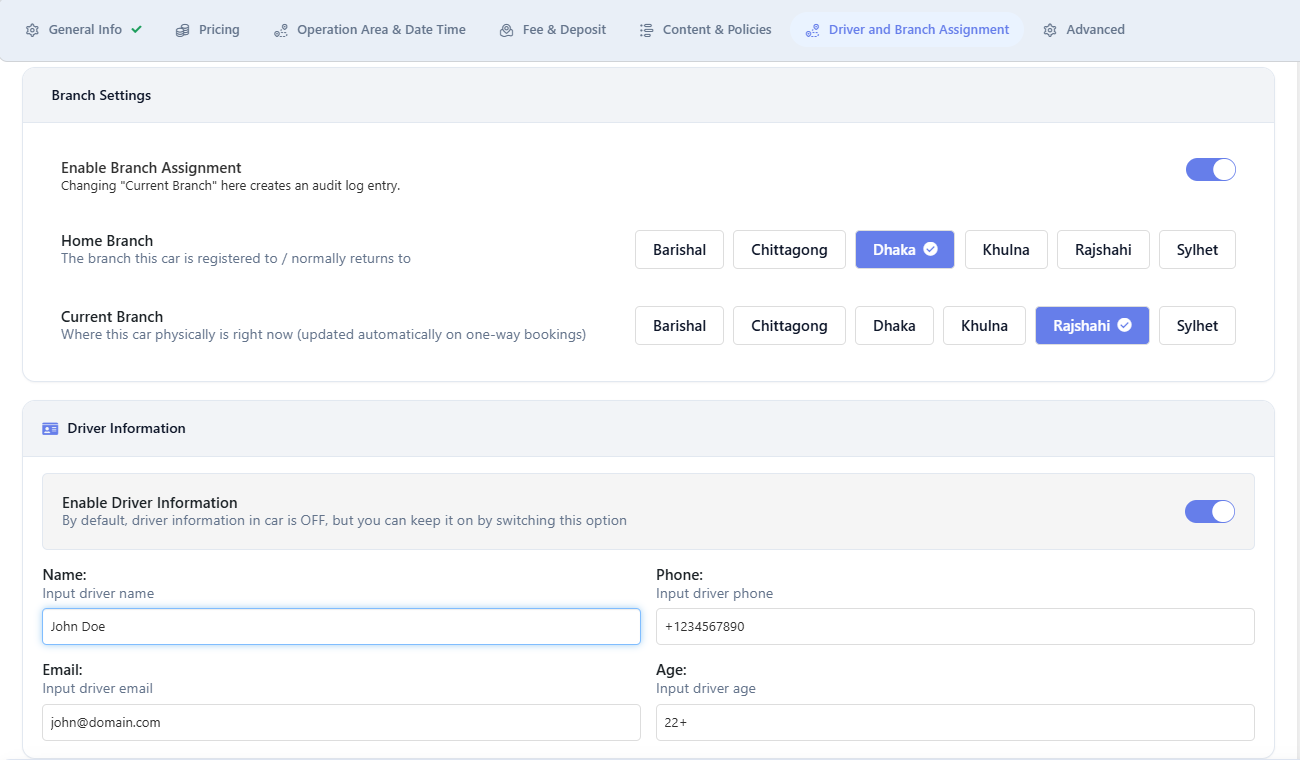
- Home Branch — the branch this vehicle is registered to / normally returns to.
- Current Branch — where the vehicle physically is right now; this updates automatically when a customer completes a one-way booking, and manually changing it creates an audit log entry.
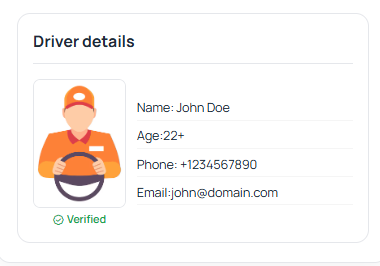
- Enable Driver Information — off by default. When enabled, add the driver’s Name, Phone, Email, and Age. This information is attached to booking records and shown to customers.
When driver information is enabled, customers see a Driver Details card on the frontend:
8. Advanced
Handles tax integration status and cross-selling recommendations for this vehicle.

- Tax Settings Information — shows whether WooCommerce tax calculation is active. If taxes are required, enable them under WooCommerce > Settings > General > Enable taxes and calculations.
- Related Rental (Similar Vehicles) — select other vehicles in your fleet to feature under “Similar Rentals” on this vehicle’s details page. Pick vehicles within the same class or price tier for a useful comparison.
Best Practices
- Set up taxonomies and branches before adding your first vehicle, so the dropdowns are ready to use.
- Keep the Operation Area and Driver and Branch Assignment steps aligned so pickup availability and branch tracking stay consistent.
- Only select FAQs and Terms that genuinely apply to each vehicle to avoid cluttering the frontend page.