Learning
Rent Item
When you first start using WpRently, the first tab you see is the Rent Item.

Here you will find all the options to configure your rental system.
All Items

By default, WpRently has some rent types built-in, which you can find in the All Items tab.
You can start editing any Rent Item for your Rental Business.
Or you can create one, and it will be listed in All Items.
Add New Rent Item Type
Before adding a new Rent Item, you need to create a Rent type or you can use an existing Rent type.
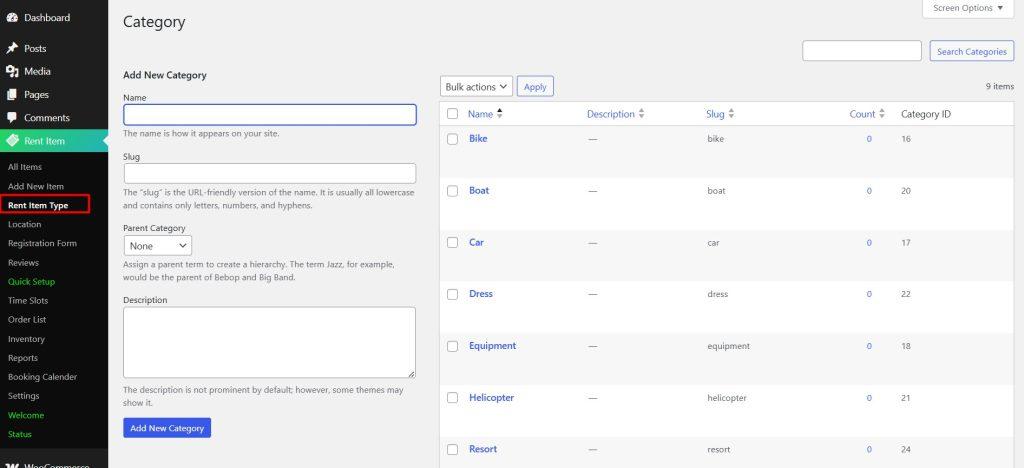
Rent Type is adding a new category.
To add a new Rent Item Type, follow Rent Item > Rent Item Type

Then Type the Name of the Rent Type, Slug of the Rent Type, select the Parent Category or keep it as None, and add a description.

Once you are done, click the Add New Category button and your new Rent Item Type will appear on the right.
How do I Add a Rental Item?
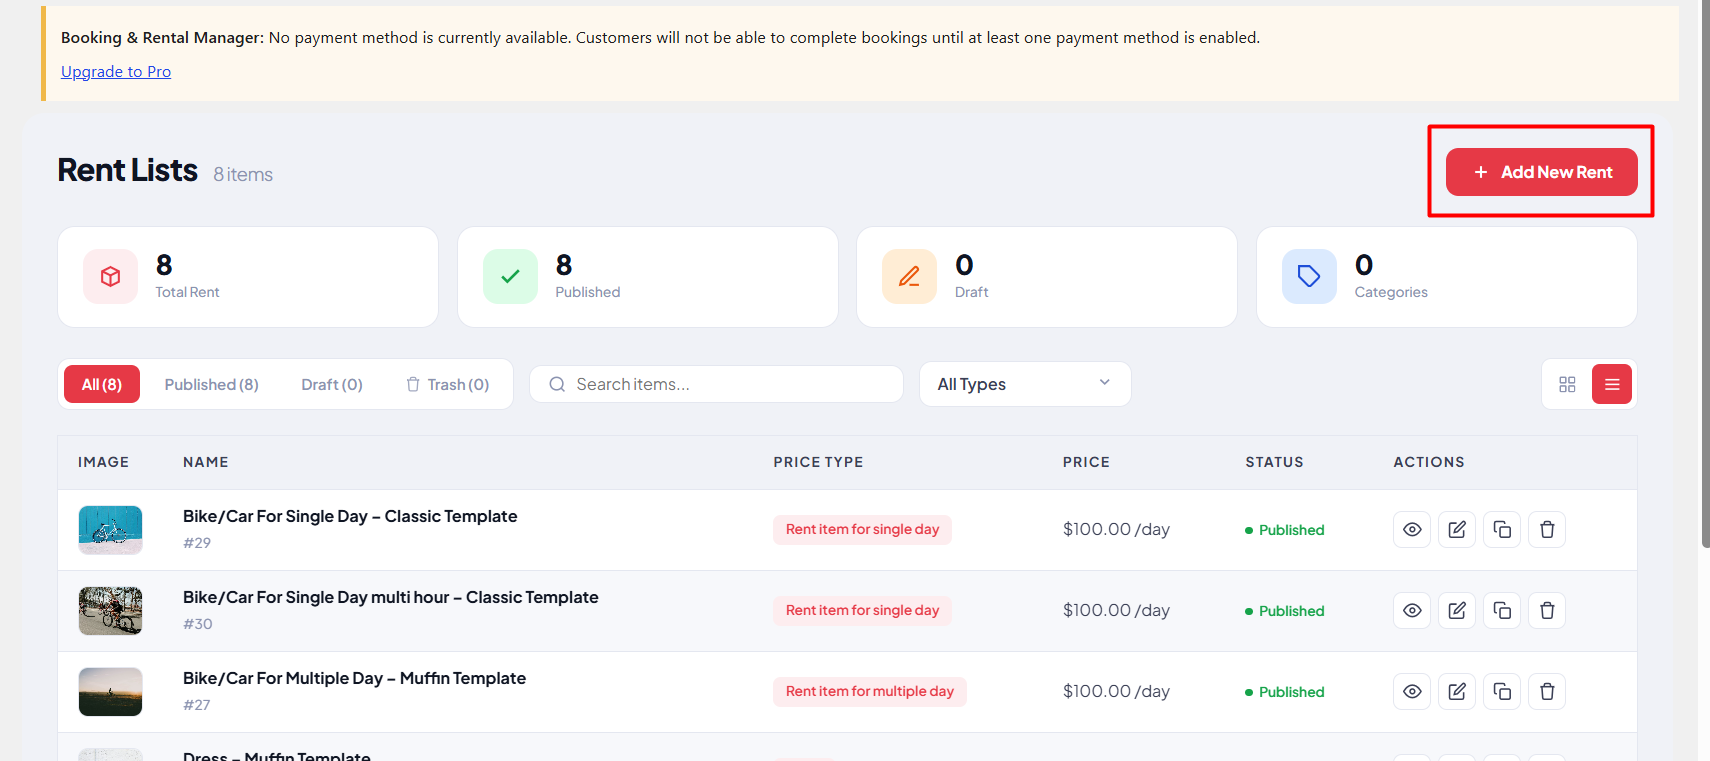
To create a new rental item, simply click the + Add New Rent button.

You will get a new modern editor of WpRently.
Switching between the Modern Editor and the Classic Editor
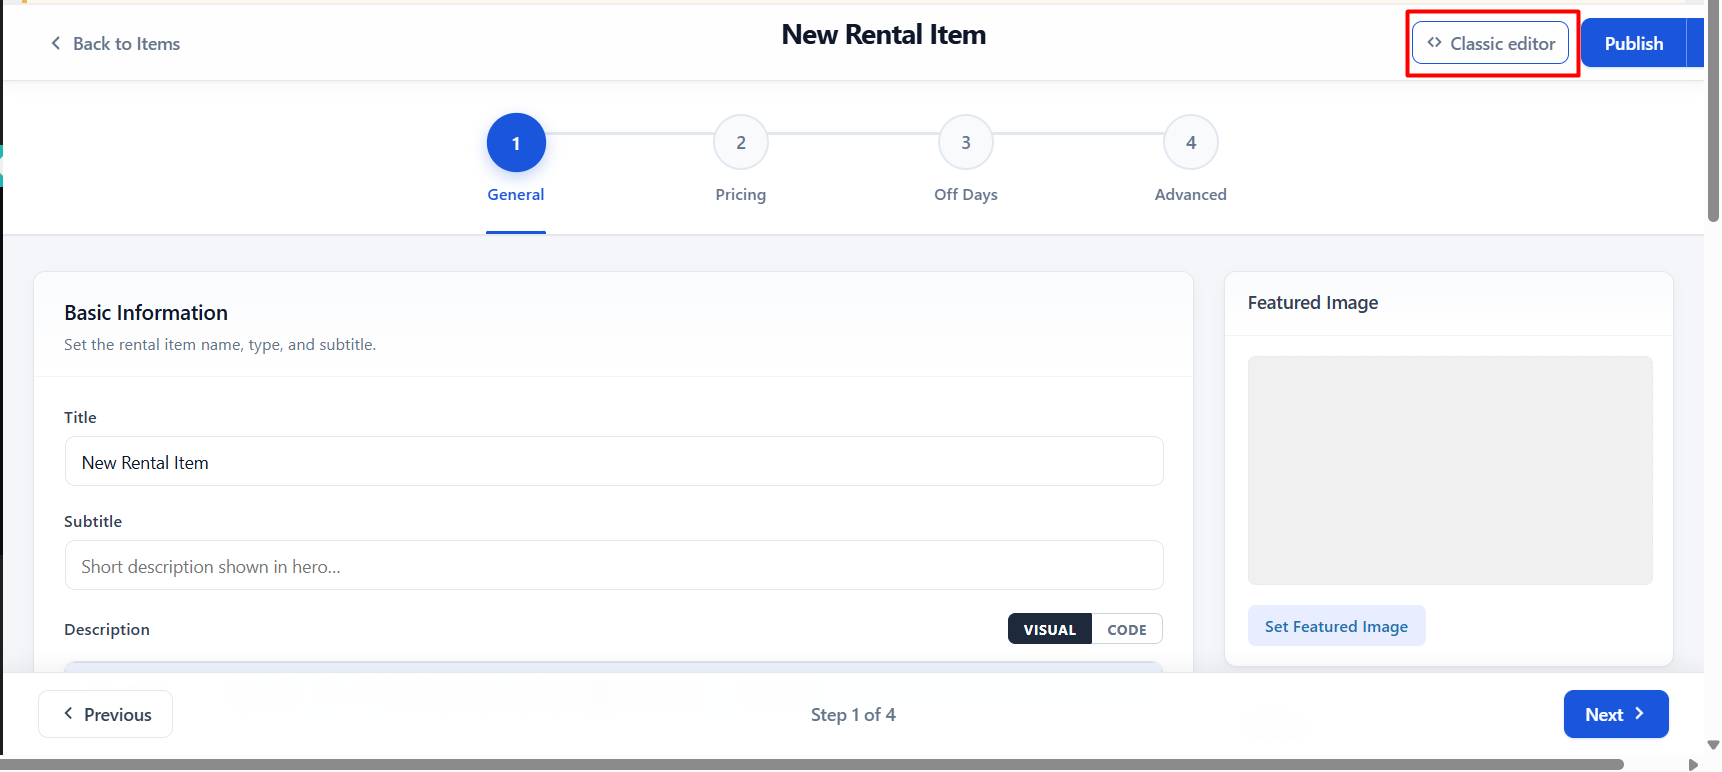
But if you don’t want to use the modern editor, you can click the <> Classic editor button.

The modern editor consists of 4 different steps to create a rental item.
General tab

This Basic Information section is the foundation for creating a new rental product in your plugin. It allows you to define the key identity of the item for both the front-end display and your internal management.
Here is an explanation of these fields for your documentation:
Basic Information Breakdown
-
Title: This is the primary name of your rental item or service (e.g., "Cox Scooty Rental"). This will likely be the main heading shown on the product page and in your booking management dashboard.
-
Subtitle: Use this field to add a brief, descriptive tag or secondary information. It helps users quickly understand the scope or location of the service, such as the specific route or service area ("Scooty rental from Dolphin Circle to Marine Drive").
-
Description (WYSIWYG Editor): This is your main content area. Using the visual editor, you can provide comprehensive details about the rental, such as:
- Features: What is included in the rental (e.g., helmet, fuel policy).
- Experience: Descriptive text about the service, like the scenic nature of the route mentioned in your example.
- Requirements: Any necessary prerequisites for the customer (e.g., valid driving license).

You can select the rent type from the category settings. If your rent item is not listed , click Add new rent type.

Now type your rent type name and click Add Rent Type.

This section allows users to showcase the unique selling points or specifications of their rental items using structured categories and icons.

Feature Category Title: Group your features by creating a category name (e.g., "Scooty Features," "Comfort Amenities," or "Safety Gear"). This provides a clean, logical heading for your customers.
Icon: You can associate a specific icon with each feature. This adds a visual element that makes your product page more engaging and helps customers scan for information quickly.
Features Name: Add the specific attribute here (e.g., "Helmet included," "GPS enabled," "Full Tank").
Add New Feature: Click this button to add another item to the current category.

Featured Image: This is the primary image that will represent your rental item across your website (e.g., in search results, category listings, and at the top of the product page). Click Set Featured Image to select or upload an image from your WordPress media library.

Gallery: Use this section to upload multiple additional images that showcase your item from different angles or highlight specific features. These images typically appear in a slider or grid on the product detail page, providing a more comprehensive view for the customer.

Add Feature Category: Use this button at the bottom to create a completely new set of features, allowing you to organize your specifications into different thematic groups.

Pricing & Rent Types Overview
This section allows you to configure how your rental service calculates costs and manages availability. Choosing the correct Rent Type is essential for ensuring your booking system behaves in a way that matches your specific business operations.
Available Rent Types
You can select the mode that best fits your inventory:
- Single Day: Best for items rented within a single day. Customers can choose specific time slots like hourly, morning, evening, or full-day booking. This is ideal for items like bikes, boats, kayaks, and other short-use rentals.
- Multiple Day: Designed for rentals that span across several consecutive days.
- Resort: Tailored for bookings based on date ranges, often used for nightly accommodations or extended stays.
- Appointment: Configured for time-based scheduling, such as services that require booking specific time blocks rather than physical items.
- Multiple day for multiple items: A versatile option for complex bookings where customers might need to rent several different items over a span of multiple days.
Single Day

The Single Day configuration allows you to manage your inventory and pricing in a granular manner. By setting individual Prices and Stock/Day limits, you maintain full control over your operational capacity for short-term rentals.
Rental Option Name: Enter the specific name or model of the item (e.g., "Classic Scooty 150 CC").
Short Description: Provide a summary of the item or its features (e.g., "Comfortable for two people").
Price: Set the base rental cost for this specific item.
Stock/Day: Define the total quantity of this item available for rent per day.
Add New Type: Click this button to create additional rental options if you have more than one item or category variant to manage.

After updating, you can see the front end as a single-day booking.

But when you toggle the Manage a single item inventory on an hourly basis, two new fields appear: one is the Duration, and the other one is Duration Type.
Manage a single-item inventory on an hourly basis: Enabling this toggle allows you to manage a shared inventory for rental items.
Rent Item Stock Quantity: This field allows you to define the total stock quantity available for rent.
Enable duration-based rental items: Turning this on allows you to set a specific time duration for rentals.
Duration: Enter the numerical value for the rental period (e.g., "1", "2", "24").
Duration Type: Use this dropdown menu to select the unit of time for the duration, choosing between Hours, Days, Weeks, or Months.

Add different Price and duration types.

You must enable the time picker and add your desired time to use different duration types.
Now update and check your frontend for booking.

Here you have selected a date and a time according to the time picker and the whole inventory stock for 1 hour.

For this reason, there is no inventory available for that day and time, and showed sold out.
If you enable duration-based rental items.

You have added a particular duration for Classic Scooty 150 CC, which is from 9 am to 12 pm.

From the front end, you can see the booking for this scooty is only set for this specific duration.
If you enable the Item Variation, you can add any type of variation to your total inventory of that item.

For example, here we have added 4 different color variation with different price which is adjusted with the total stock quantity. And if you select default check box, it will be selected by default on the front end.

From the front-end booking, you can find the price for that specific duration as the base price for 4 different color and their variation price in total.
You can add an extra fee for your rental item. Simply toggle Fee Configuration settings.
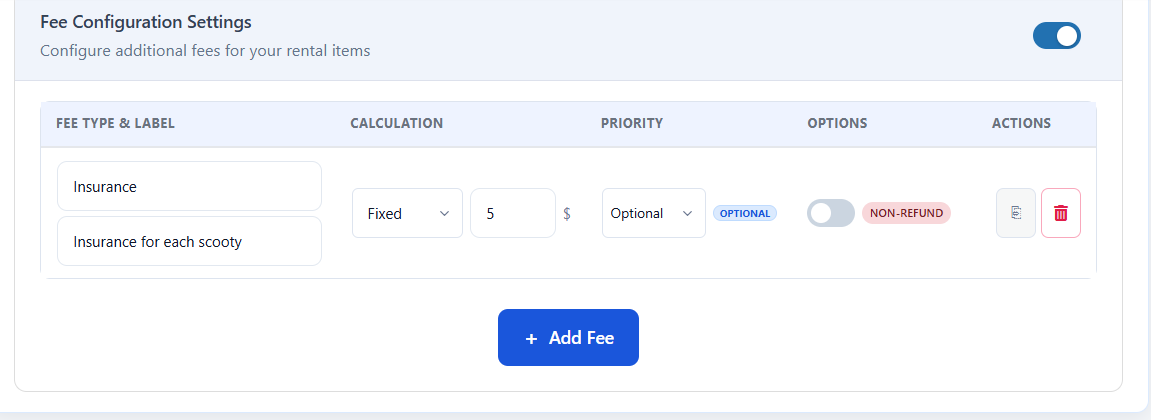
You can add the label, description, calculation type like fixed or percentage, amount and priority like optional or required and refund or non-refund.

As you can see there is a fee management field appear with the option to toggle for this fee.
Multiple Day

Multiple Day mode is designed for flexible, long-term rentals (such as cars, equipment, or sports gear) where pricing needs to adjust based on the length of the booking.
1. Duration Rates
This section allows you to set dynamic pricing based on the rental length:
- Monthly/Weekly/Daily Price: Set base rates for each time unit.
- Thresholds: Define specific rules for when a rental duration transitions from one rate to the next (e.g., how many days constitute a "month" or "week").
For example Monthly price is $4000 but you can set the threshold to count your month as 28 days instead of 30 or 31 days. So if your days exceeds 28 days it will charge $4000.
Also, for Weekly price is $1000 per week but you can set the threshold to count your week as 5 days instead of 7 days. So if your days exceeds 5 days it will charge $1000.
2. Time Configuration
When Enable Time Picker is toggled on, you can offer highly granular rental options:
- Half-Day Price & Threshold: Define a specific price for shorter rental periods and set the hour range (e.g., 7 to 12 hours) that triggers this rate.
- Hourly Price & DayThreshold: Set an hourly rate and a threshold limit; if rental hours exceed this limit, the system can automatically treat it as a full-day booking.

Here the duration is 3 weeks 4 days, so the price for 3 weeks is $3000 and for 4 days is $400.

Here, the duration is 3 weeks 5 days, but it counts as 1 month (4 weeks) because the threshold for 1 week is 5 days. So 4 weeks is counted as 1 month, and the price for 4 weeks is $4000.

The threshold for 1 month is 28 days, and cost is $4000. So in this booking the duration is more than 28 days so it is charged for 1 month.
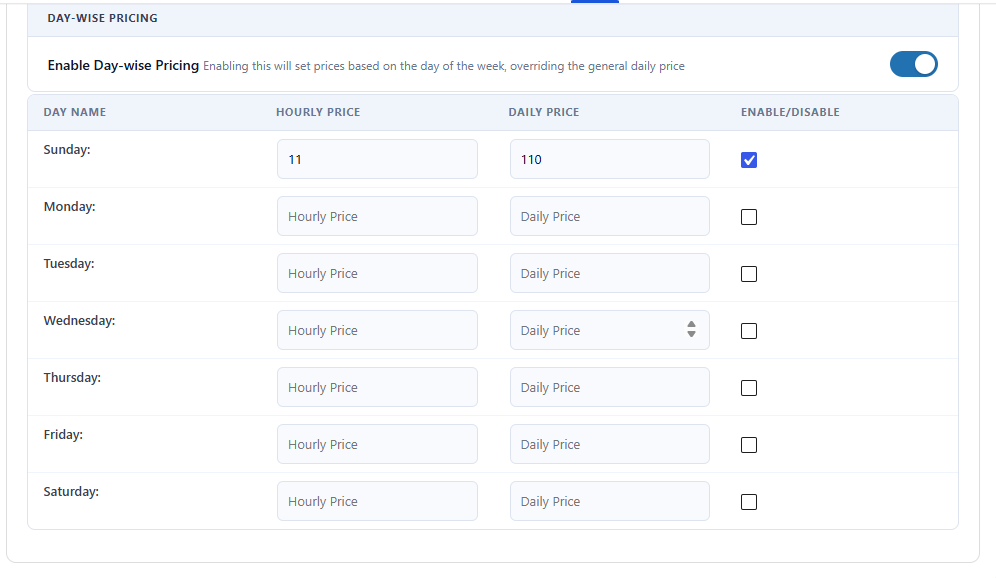
If you enable Day-wise pricing, you can set a specific day price of your choice for a whole day or half day.

Enable category-wise extra services: Use this primary toggle to activate or deactivate the functionality for the current item.
Additional Service Category Title: Group your extras into logical categories (e.g., "Service Type," "Refreshments," or "Safety Add-ons").
Icon: Assign an icon to each extra service for a clean, visual representation on the booking page.
Service Name: Define the specific extra service (e.g., "Drinking Water").
Quantity/Price Fields: Specify the quantity available (e.g., "2") and the associated cost for the service (e.g., "100").
Pricing Mode:
- One Time: A flat fee applied once per booking.
- Day Wise: A recurring fee applied for each day of the rental period.

As you can see, the extra service type is displayed for a one-time payment.
Inventory Settings Breakdown

- Stock Quantity: Set the total number of items available for rent in your inventory.
- Inventory Management by Return Date: When enabled, the system automatically marks items as available for new bookings as soon as the scheduled return date passes, ensuring accurate, real-time availability.
- Enable Multiple Item Choosing Option: Toggling this on allows customers to select more than one unit of the same item per booking. This is particularly useful for rentals like bikes, cars, or equipment where customers may need to book multiple units simultaneously.
- Item Variation: Enable this feature to define different variations for your rental item (e.g., different sizes for a scooter, colors, or technical specifications). This works across multiple rental types, including Single Day and various multi-day categories.
Resort Rental

Create a new rental item and add title, description, category, item features settings feature image and gallery images. And move to the next step.

Resort Configuration
This mode is designed for hotels, resorts, and vacation stays where pricing is automatically calculated based on nights or full-day occupancy.
-
Resort Rent Type: Selecting this enables a specialized interface for defining different accommodation types.
-
Day-long Price Configuration: Toggle this on if you wish to set pricing for same-day check-in/check-out options.
-
Accommodation Management:
- Room Type: Define the name of the room or suite (e.g., "Superior Rooms," "Family Suites").
- Day-Night Price: Set the nightly rate for that specific room category.
- Short Description: Add a brief summary (e.g., "Room for 2," "Room for 4").
- Stock Quantity: Specify the total number of units available for that room type.
-
Add New Resort Type: Click this button to add additional room categories to your resort listing.

The frontend displays the resort booking interface.
You can select the check-in and check-out dates and select a room type.
Appointment
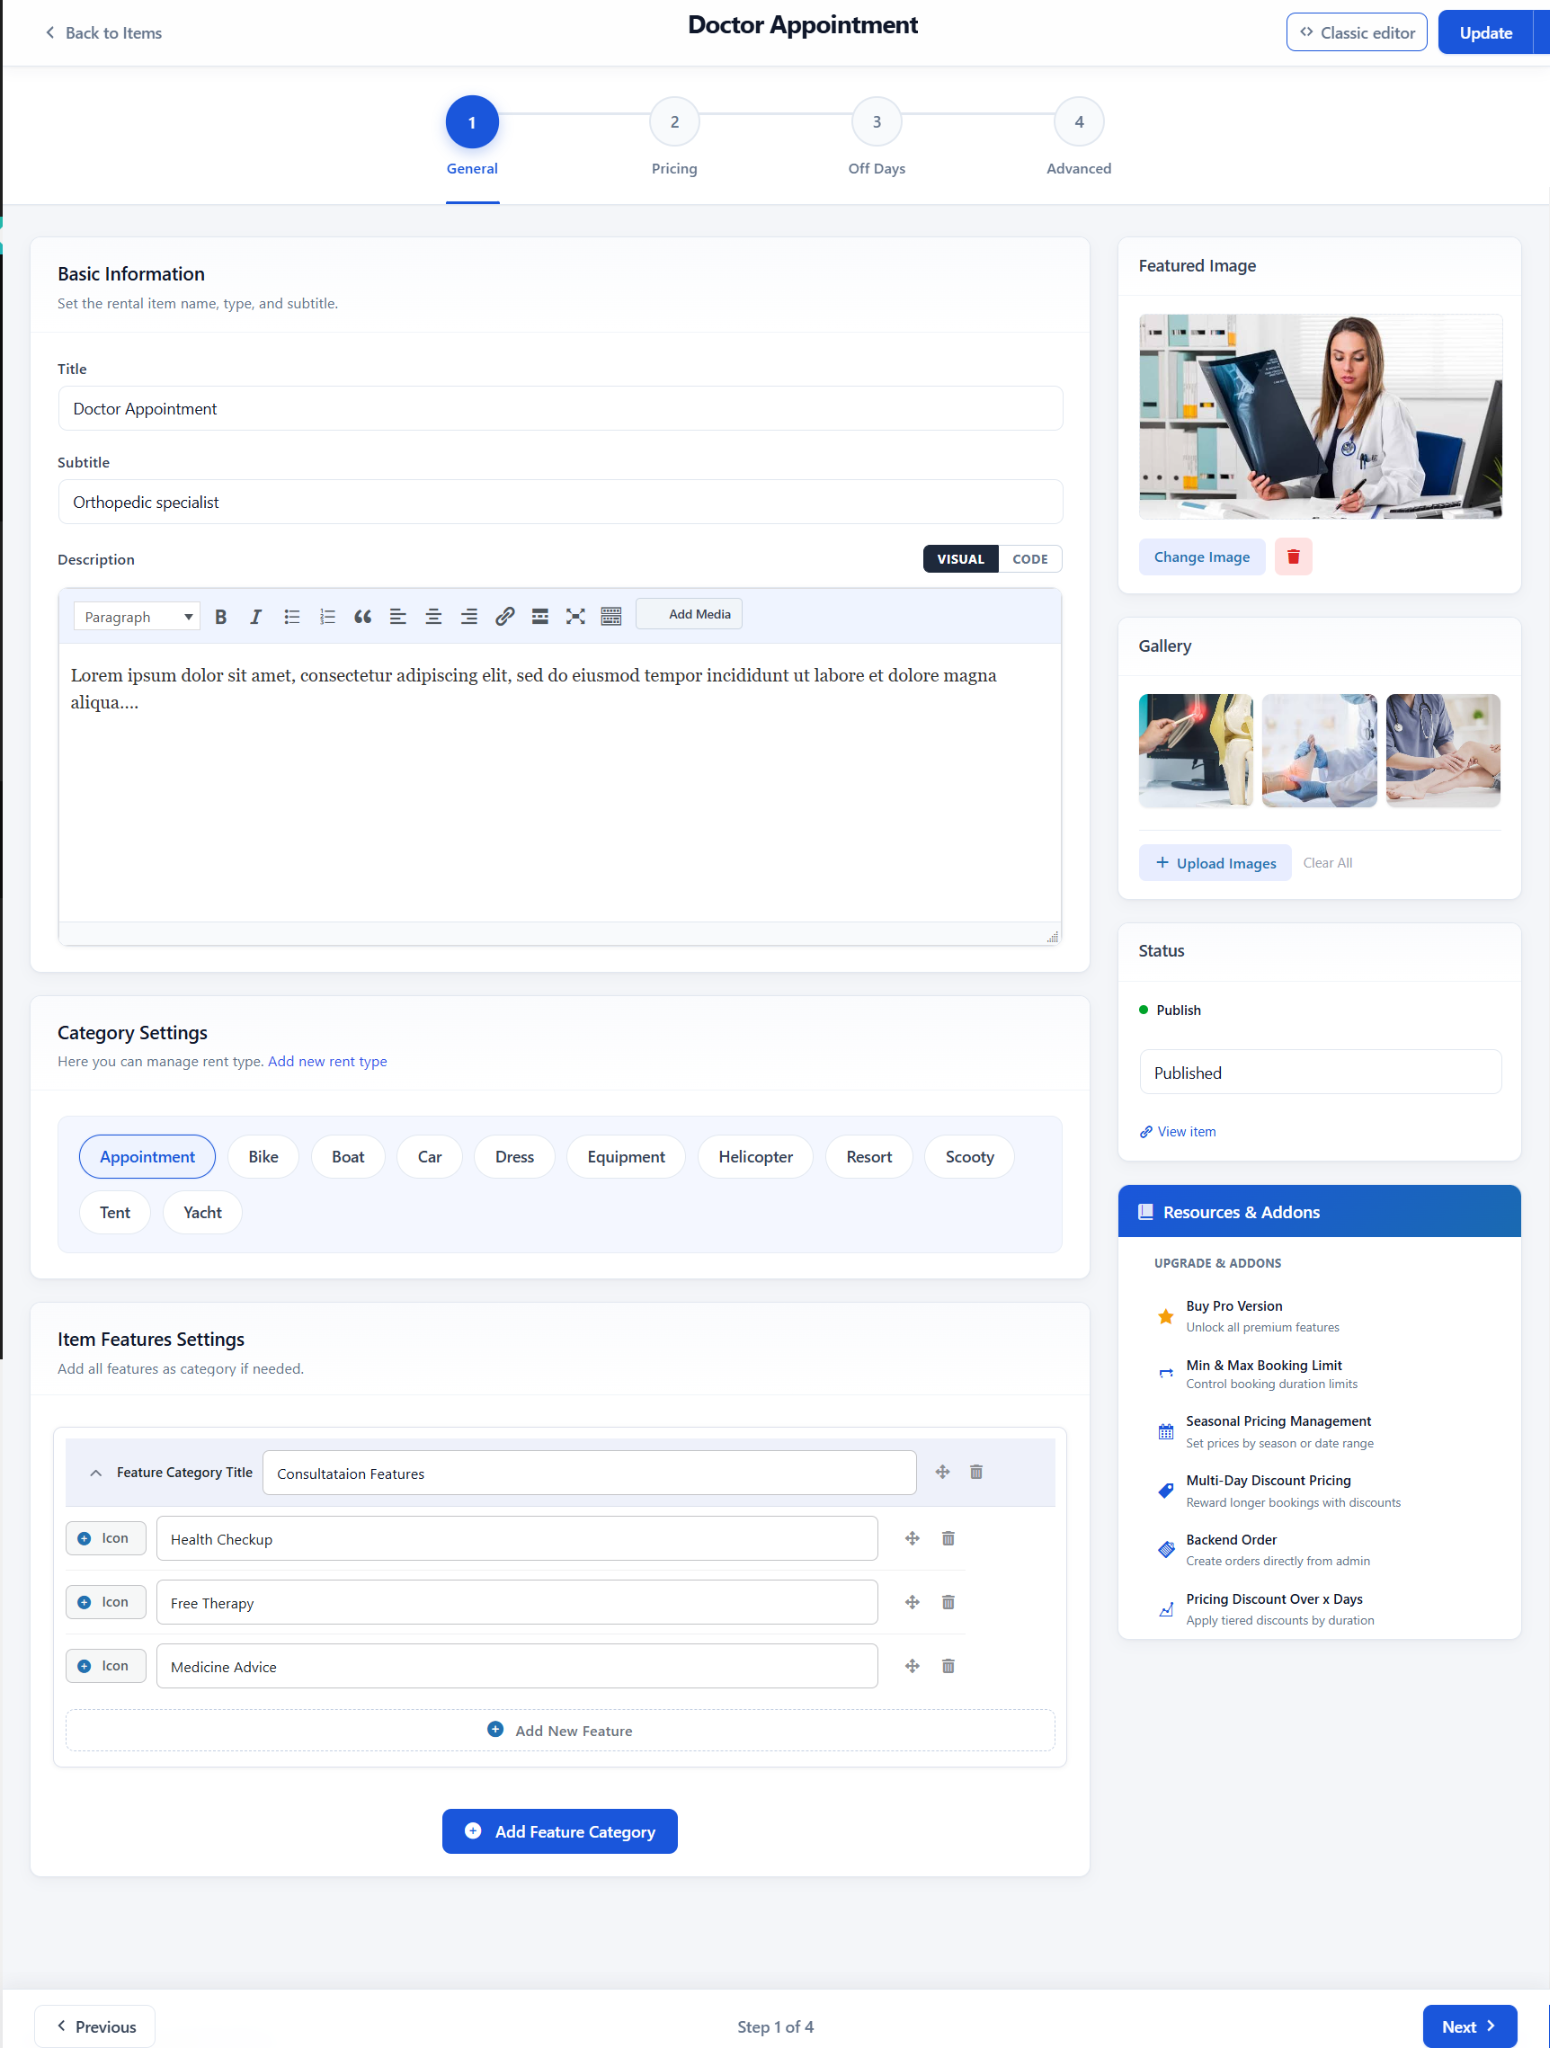
The Appointment rent type transforms WpRently into a robust scheduling tool. By utilizing the General settings to define your service scope and highlighting specific Consultation Features, you provide a clear, professional booking experience for clients looking to schedule time-based services rather than rent physical equipment.
Basic Information: Define the service title (e.g., "Doctor Appointment") and subtitle (e.g., "Orthopedic specialist"). The Description editor allows you to detail the nature of the service, what to expect, or preparation instructions.
Category Settings: Quickly select "Appointment" as the rent type to trigger the appropriate booking logic for this item, differentiating it from rental items like bikes or resorts.
Item Features Settings: Tailor the service specifications using categorized features and icons. In this example, features like "Health Checkup," "Free Therapy," and "Medicine Advice" are grouped under the "Consultation Features" category.
Media & Status Sidebar: Manage the visual brand of your service through the Featured Image and Gallery, and control publication via the Status (Draft/Published) toggle.
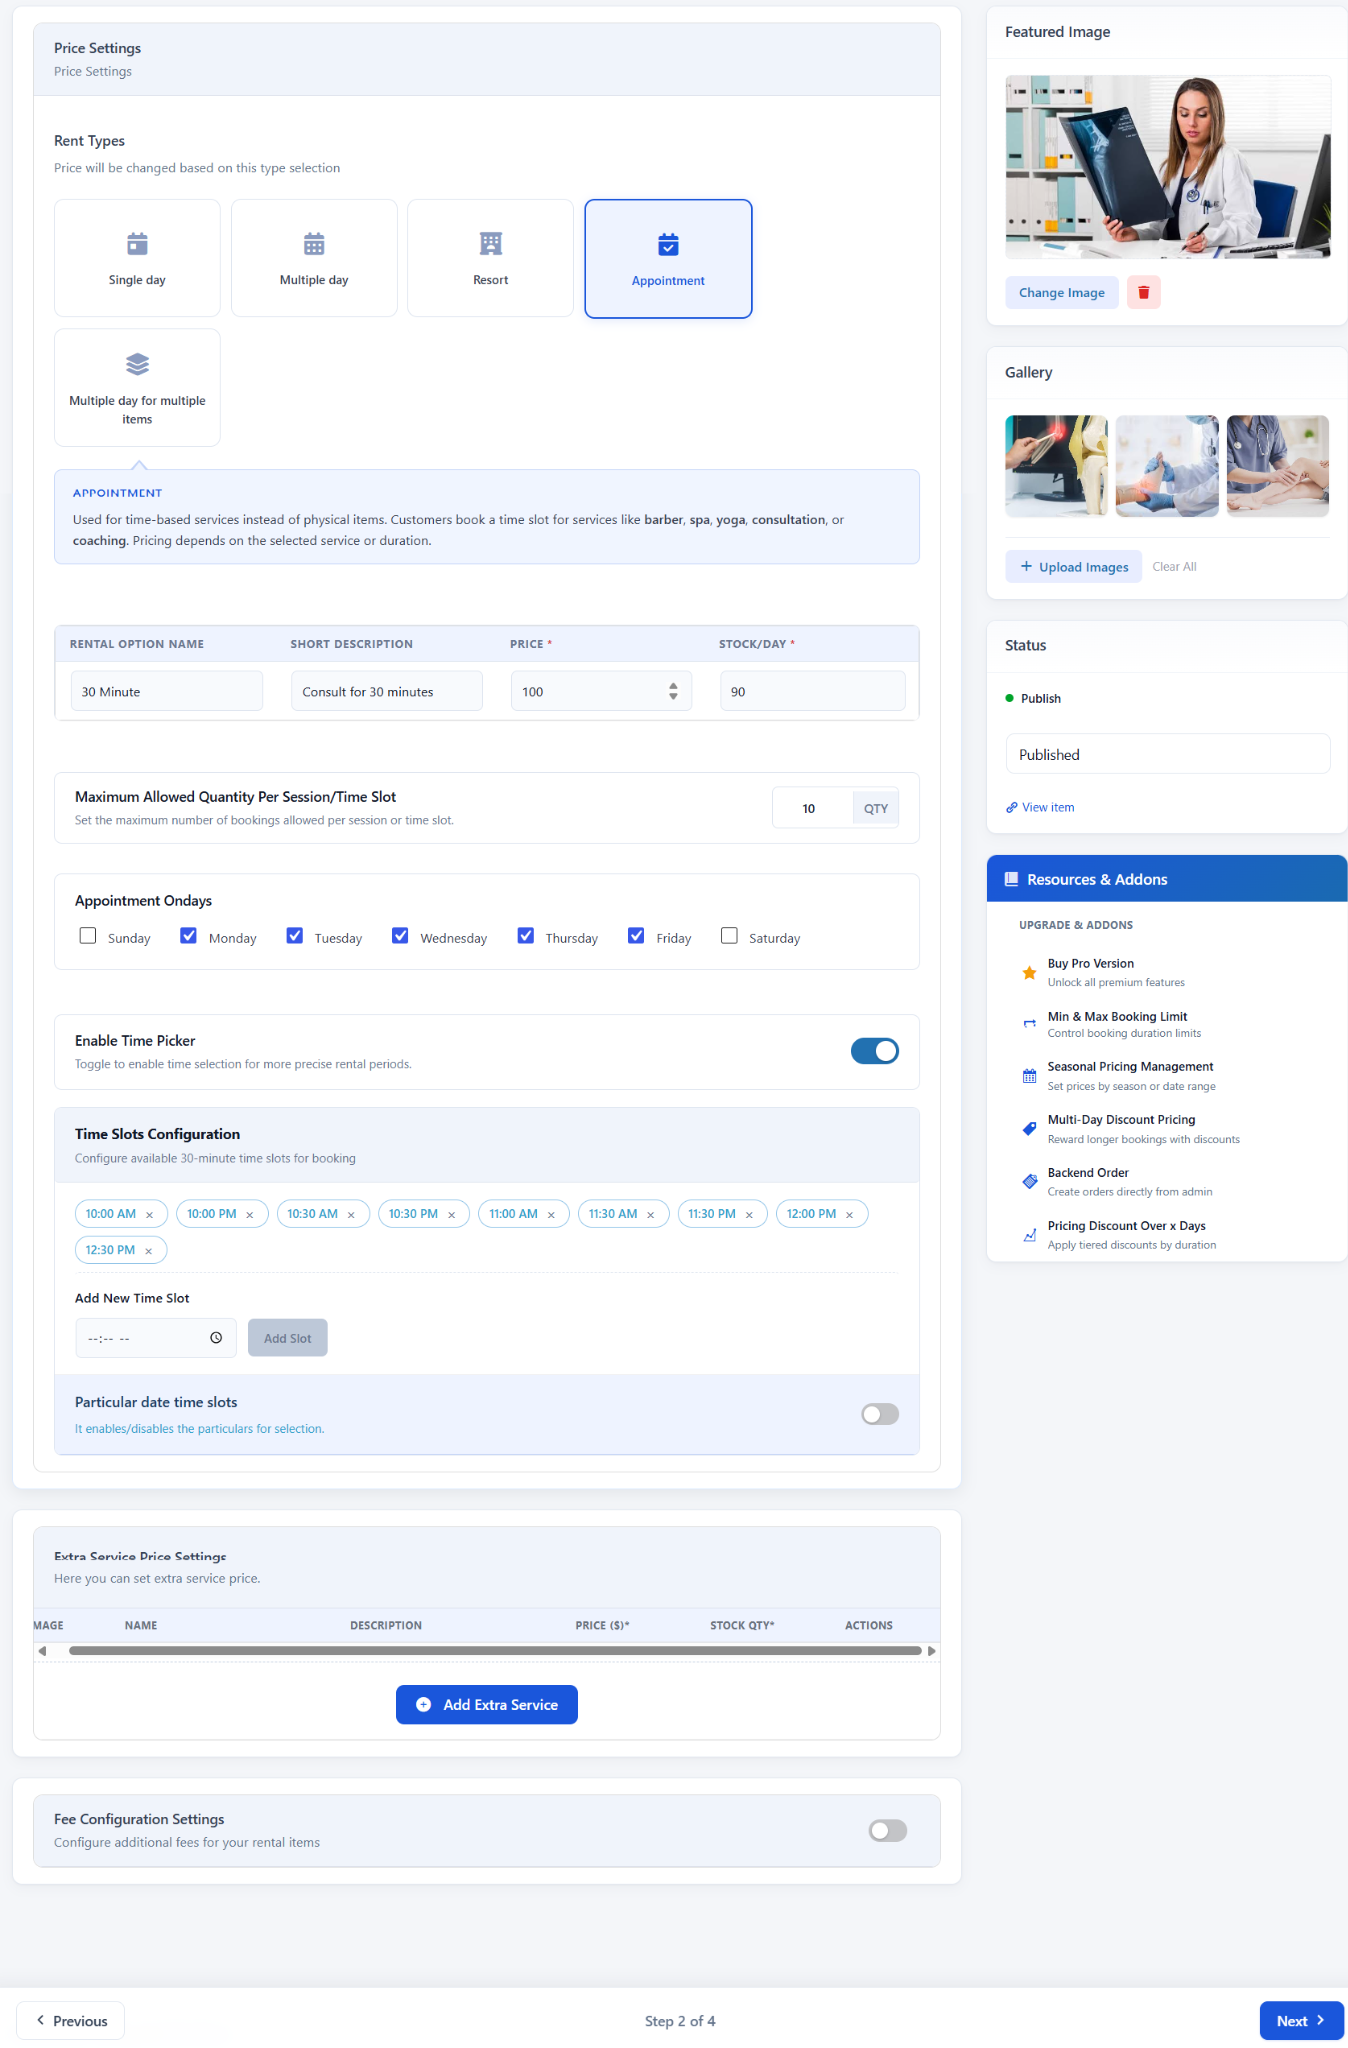
Appointment Pricing & Scheduling Configuration
-
Rental Option Details: Define the service name (e.g., "30 Minute"), provide a description, set the price, and define the stock capacity per day.
-
Maximum Allowed Quantity Per Session/Time Slot: Set the maximum number of bookings you can accommodate for any single time slot.
-
Appointment Ondays: Select the specific days of the week when this service is available for booking.
-
Time Slots Configuration:
- Enable Time Picker: Toggle this on to allow customers to choose precise time blocks.
- Available Slots: Define the specific available times (e.g., 10:00 AM, 10:30 AM) and add new slots as needed.
- Particular date time slots: A toggle to enable or disable specific slots for particular dates if required.

From the front-end booking, you can book an appointment from the schedule and can add your consultation time based on the price.
Multiple Day Multiple Item

The Multiple day for multiple items configuration offers maximum flexibility for complex, multi-product bookings. By setting automated Pricing Thresholds, you ensure customers always receive the best possible rate while your inventory is managed accurately across all selected items.
This mode is ideal for scenarios where customers need to rent multiple distinct products within a single booking, such as equipment bundles or group rentals.
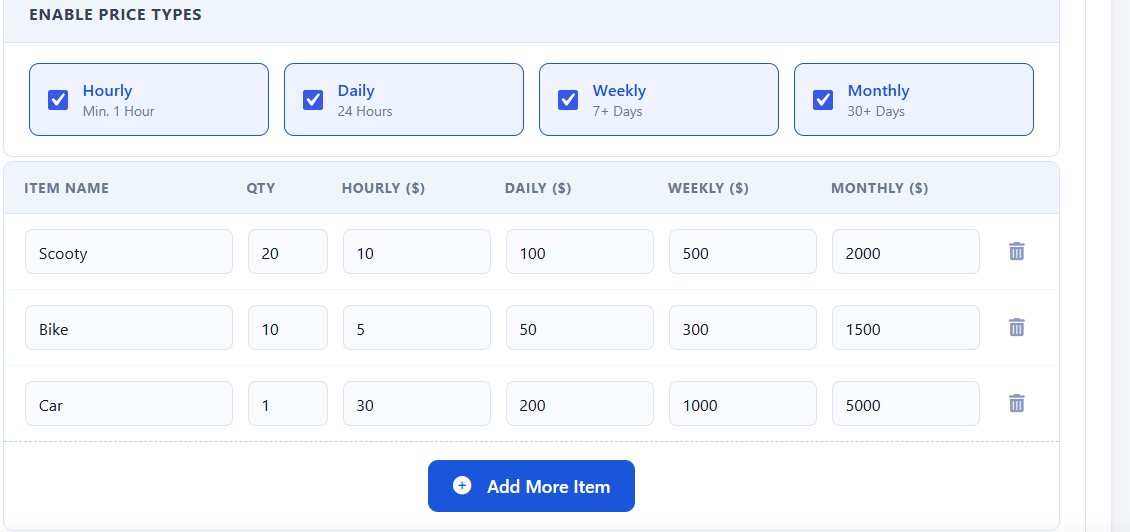
Enable Price Types & Item Management
- Price Types: Activate hourly, daily, weekly, or monthly pricing models to match your business requirements.
- Item Management: Add multiple line items (e.g., "Scooty," "Bike," "Car") and define their specific hourly, daily, weekly, and monthly rates, along with available quantity (QTY) for each.

Pricing Automation & Thresholds
Automate your rental pricing with dynamic thresholds:
- Hourly to Daily/Daily to Weekly/Weekly to Monthly: Define the exact number of hours, days, or weeks after which the system automatically upgrades the rate to the more cost-effective tier (e.g., automatically applying a weekly rate once a rental exceeds 5 days).
- Auto-Pilot Logic: The system intelligently calculates the cheapest combination of rates for the customer, unless the rental duration exceeds the defined thresholds, at which point the higher rate caps the price for that period.

Time Slots & Inventory
- Time Slots Configuration: Enable the Time Picker to set specific available booking intervals (in 30-minute increments).
- Inventory: Manage the total stock quantity for the entire bundle, enable Inventory Management by Return Date, and configure Item Variations if needed.
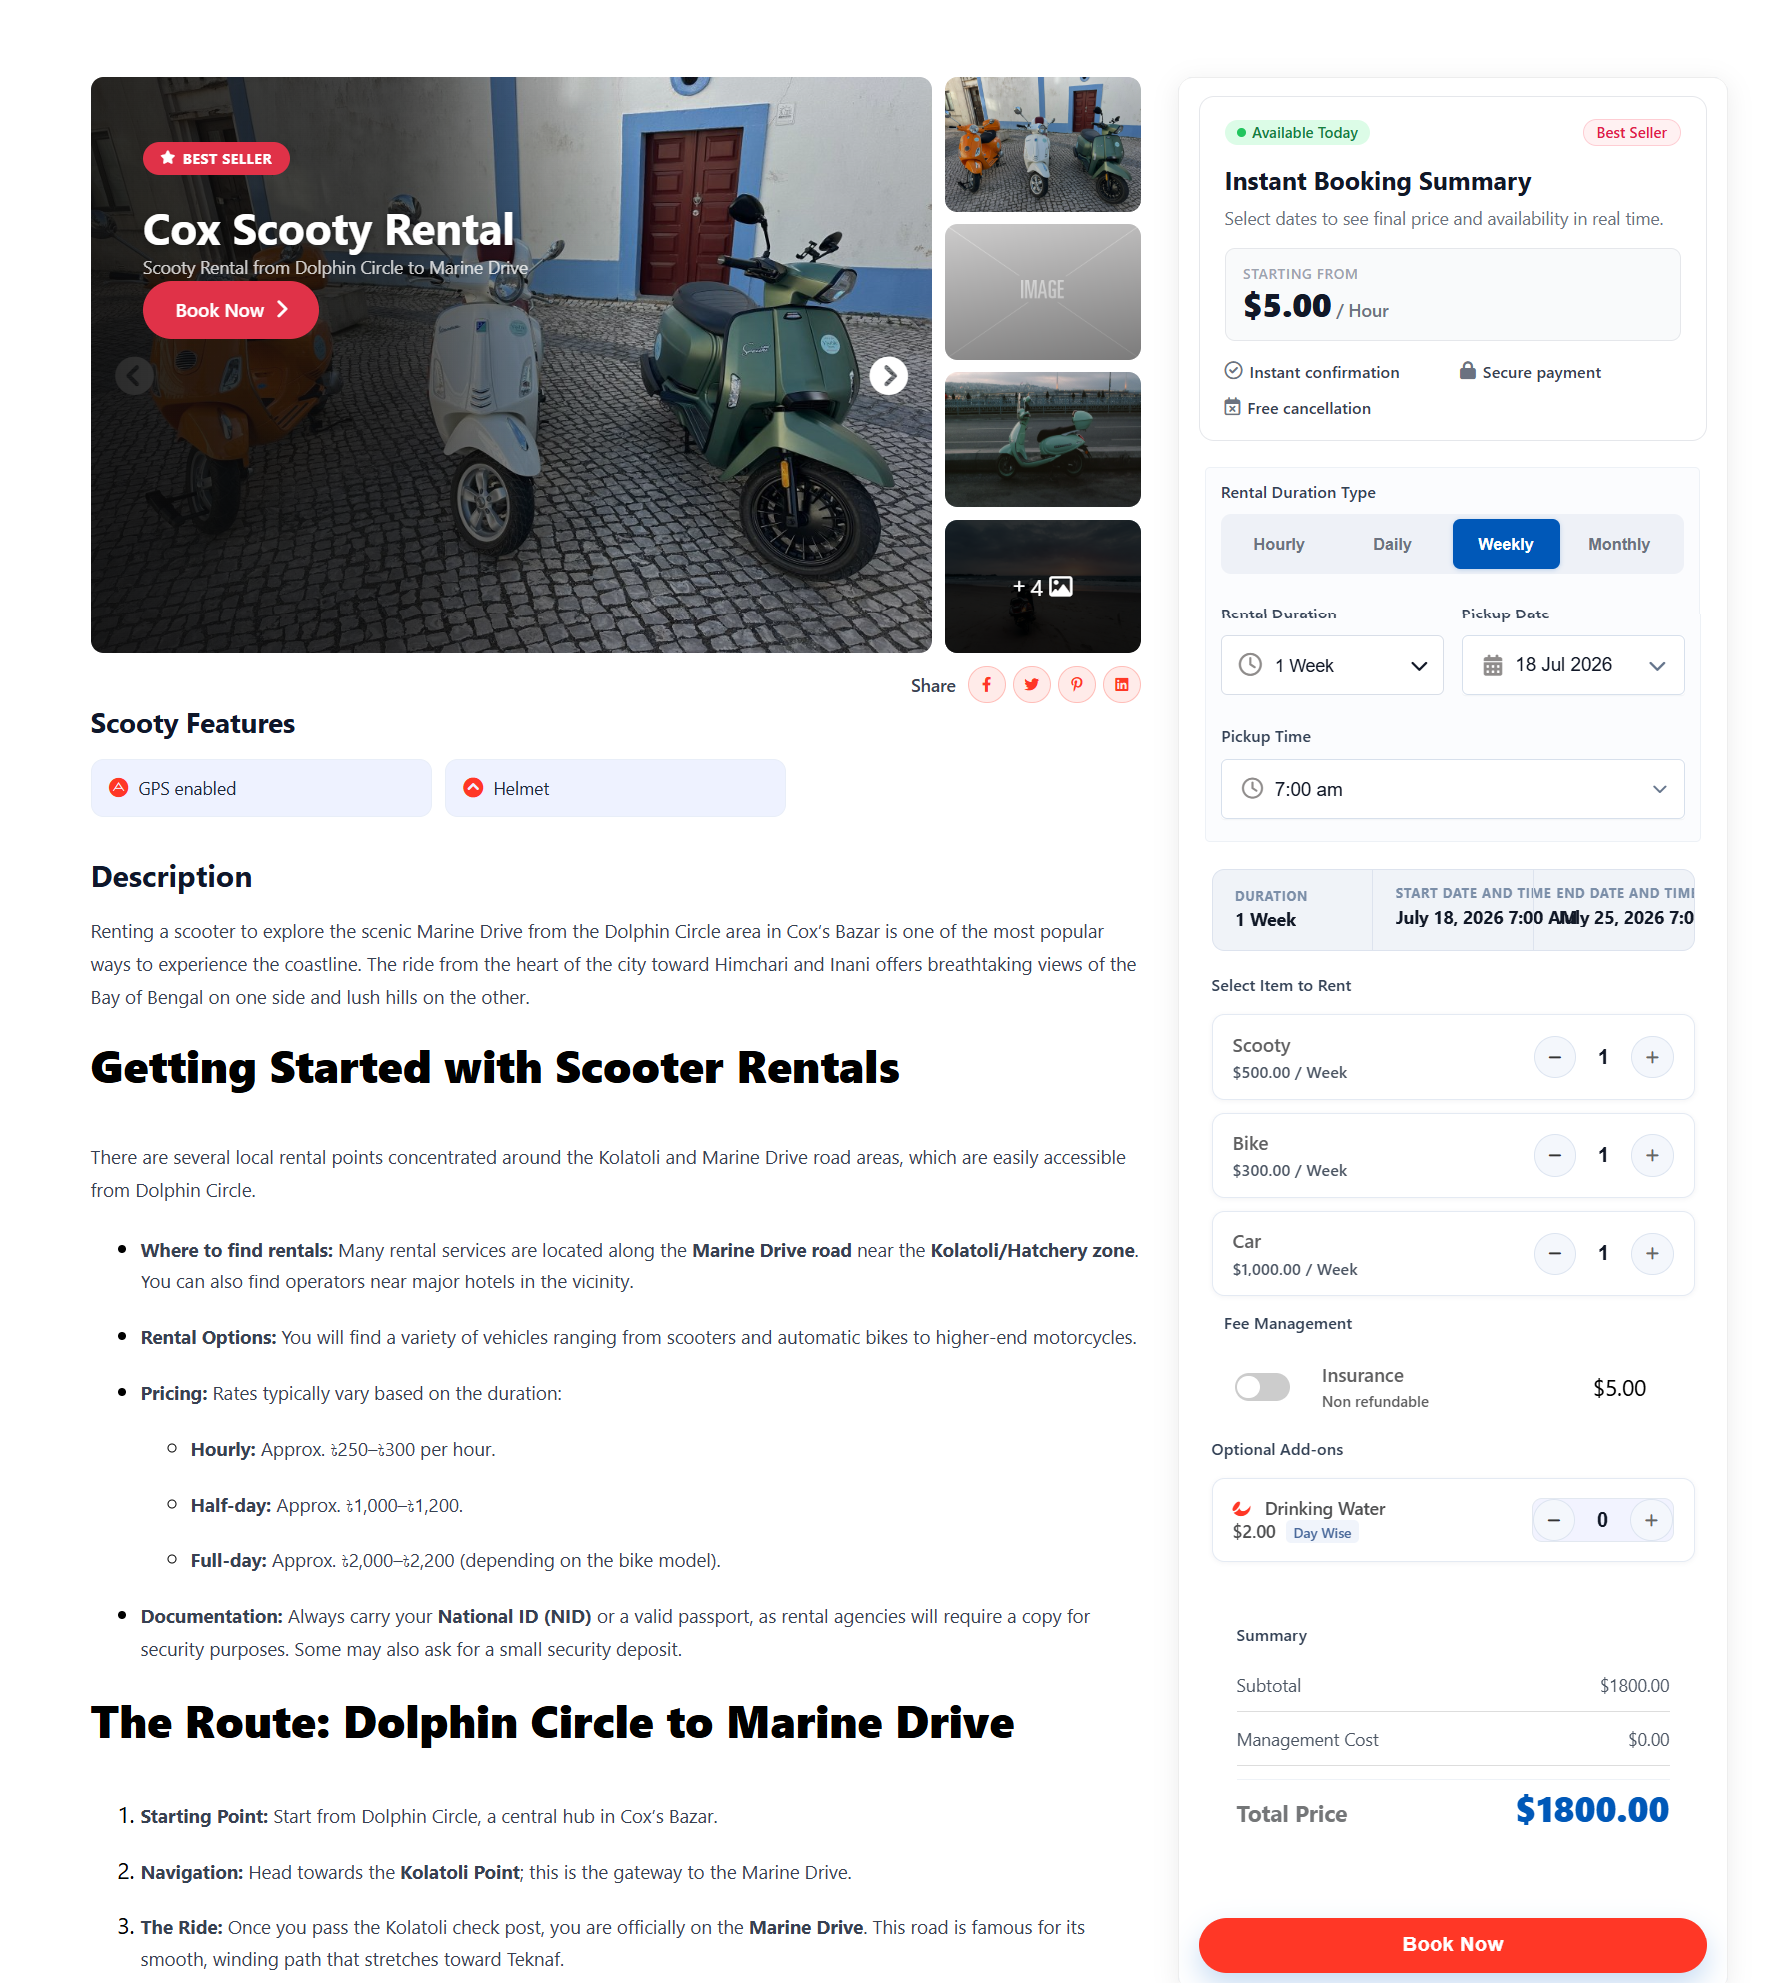
The frontend interface demonstrates the power of the Multiple Day for Multiple Items rent type. It provides a seamless, all-in-one booking experience where customers can select various vehicles, configure durations, and add optional services or insurance in real-time, significantly simplifying complex group or bundle rentals.
Off Day Settings

The Off Days tab ensures you stay in control of your operational calendar.
1. Block Booking Logic

When enabled, this powerful feature prevents bookings from being placed if they conflict with your configured off days. The plugin follows these strict rules:
- Rule 1: Prevents selection of a pickup date on an off day.
- Rule 2: Prevents selection of a return date on an off day.
- Rule 3: Blocks any booking attempt that overlaps with an off day, even if the start or end dates fall on available days.
- Rule 4: You can enable or disable this entire behavior to fit your business requirements.
2. Off Day Settings (Weekly)
- Day Selection: Easily click to toggle specific days of the week (e.g., Wednesday) as recurring off days.
- Buffer Time Before/After (Hours): This allows you to add mandatory "downtime" before and after a booking, useful for maintenance, cleaning, or vehicle preparation between rentals.
3. Off Date Settings
- This section lets you define specific, non-recurring periods (e.g., public holidays or scheduled maintenance shutdowns) by selecting a Start Date and an End Date.
- Add Another Range: Use this to create multiple distinct blackout periods as needed throughout the calendar year.
Advanced Tab

The Advanced location settings provide the ultimate control for multi-point rental businesses. By configuring specific Pick-up and Drop-off Locations and enabling Location Inventory & Price, you can automate complex logistics, ensuring your stock levels and pricing remain accurate regardless of where your customers start or end their journey.
Manage Locations: Use this interface to add, rename, or remove the locations available for your rental items (e.g., "Dolphin Circle," "Marine Drive Patuartek").
Pick-up Location: Toggle this on to allow customers to choose where they will collect their rented item. You can select one or multiple approved locations from your managed list.
Drop-off Location: Toggle this on to let customers select where they will return the item. This is particularly useful if your business supports one-way rentals.
Location Inventory & Price: When enabled, this feature links your inventory and pricing directly to specific locations. Customers must choose a pick-up location first, and the system will then factor in any location-specific stock limits or price adjustments into their booking total.

The Template and FAQ settings allow you to refine the user experience on your product pages. Selecting the right template ensures your site looks cohesive, while a well-populated FAQ section provides essential information to customers instantly, helping them make informed decisions and speeding up the booking process.
Advanced: Template & FAQ Settings
-
Template: Choose the visual layout for your rental item page.
- Default Template: A standard, proven layout for listing your rental items.
- Muffin Template: An alternative design layout, allowing you to select the appearance that best fits your website's overall aesthetic.
-
FAQ Settings Enable: Toggle this on to display a Frequently Asked Questions section on your product page.
- Manage FAQs: Use the list to view, edit, or delete existing questions.
- Add FAQ: Click this button to create new questions and answers, helping to proactively address customer inquiries, reduce support tickets, and build confidence in your rental service.

The Tax & Security Deposit settings provide the necessary tools to handle financial compliance and risk management. Ensure your base WooCommerce tax settings are configured correctly to leverage the automated tax features here, and use the Security Deposit option to easily set flat-rate deposits that protect your rental items.
Advanced: Tax & Security Deposit Configuration
-
Tax Settings: Use this toggle to enable tax information for your items.
- Note: To utilize automated tax calculations, you must first ensure that the "Enable taxes and tax calculations" option is checked in your main WooCommerce > Settings > General area.
-
Security Deposit: Use this toggle to turn the security deposit feature on or off.
- Security Deposit Label: Define the name shown to customers (e.g., "Security Deposit").
- Type: Specify the deposit method, such as a Fixed Amount or Percentage.
- Amount: Set the specific value for the deposit (e.g., "2").
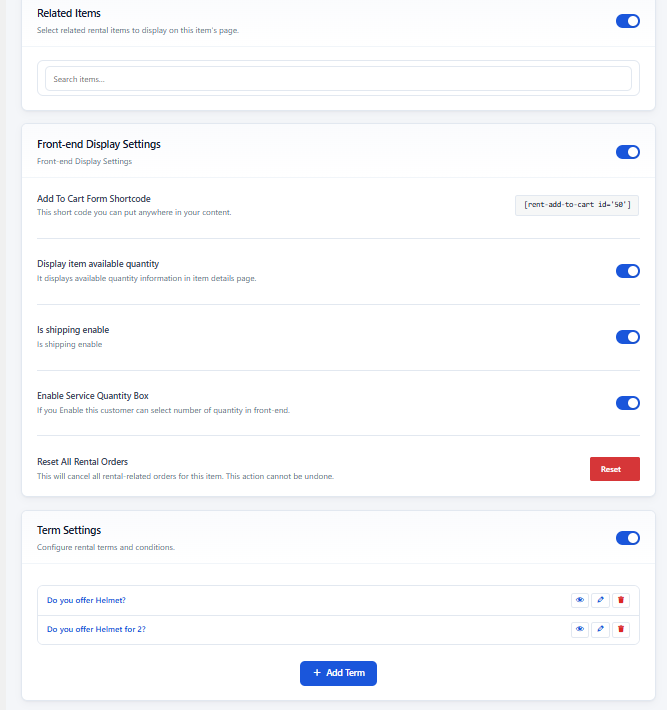
Display & Term Settings
-
Related Items: Toggle this on and use the search bar to select other rental items you want to recommend to customers on this product's page, helping to increase engagement and cross-sells.
-
Front-end Display Settings:
- Add To Cart Form Shortcode: Displays a unique shortcode (e.g.,
[rent-add-to-cart id='50']) that you can embed anywhere on your site to allow direct bookings. - Display item available quantity: Toggle this on to show customers how many items are currently in stock.
- Is shipping enable: Enable this if your rental service includes a shipping component.
- Enable Service Quantity Box: Toggle this on to allow customers to specify the quantity they wish to rent directly on the front-end.
- Reset All Rental Orders: A critical action button that cancels all rental-related orders associated with this specific item. Note: This action cannot be undone.
- Add To Cart Form Shortcode: Displays a unique shortcode (e.g.,
-
Term Settings:
- Use this section to configure and display your specific Rental Terms and Conditions. You can add new terms using the Add Term button and manage existing entries with the provided view, edit, and delete controls.
Coupon

Coupons & Automatic Discounts Dashboard
This centralized hub allows you to create, manage, and track the performance of all your discount initiatives, whether they are manual coupon codes or automatic discount rules.
-
Overview Stats: Get an instant snapshot of your promotional performance, including:
- Total Coupons: The total number of coupons created.
- Active: How many coupons are currently active.
- Redemptions: Total number of times coupons have been applied by customers.
- Customer Savings: The total monetary value customers have saved using your promotions.
-
Booking Mode Status: Displays your current operational mode (e.g., WooCommerce Booking Mode).
-
Management & Actions:
- Coupon List: Once created, your coupons will be listed here, showing details such as the Code, Discount type, items it Applies To, Validity periods, Usage statistics, and current Status.
- Add Coupon: Click the + Add Coupon button (at the top right or center) to initiate the creation of a new promotional code or automatic discount rule.
Booking Calendar
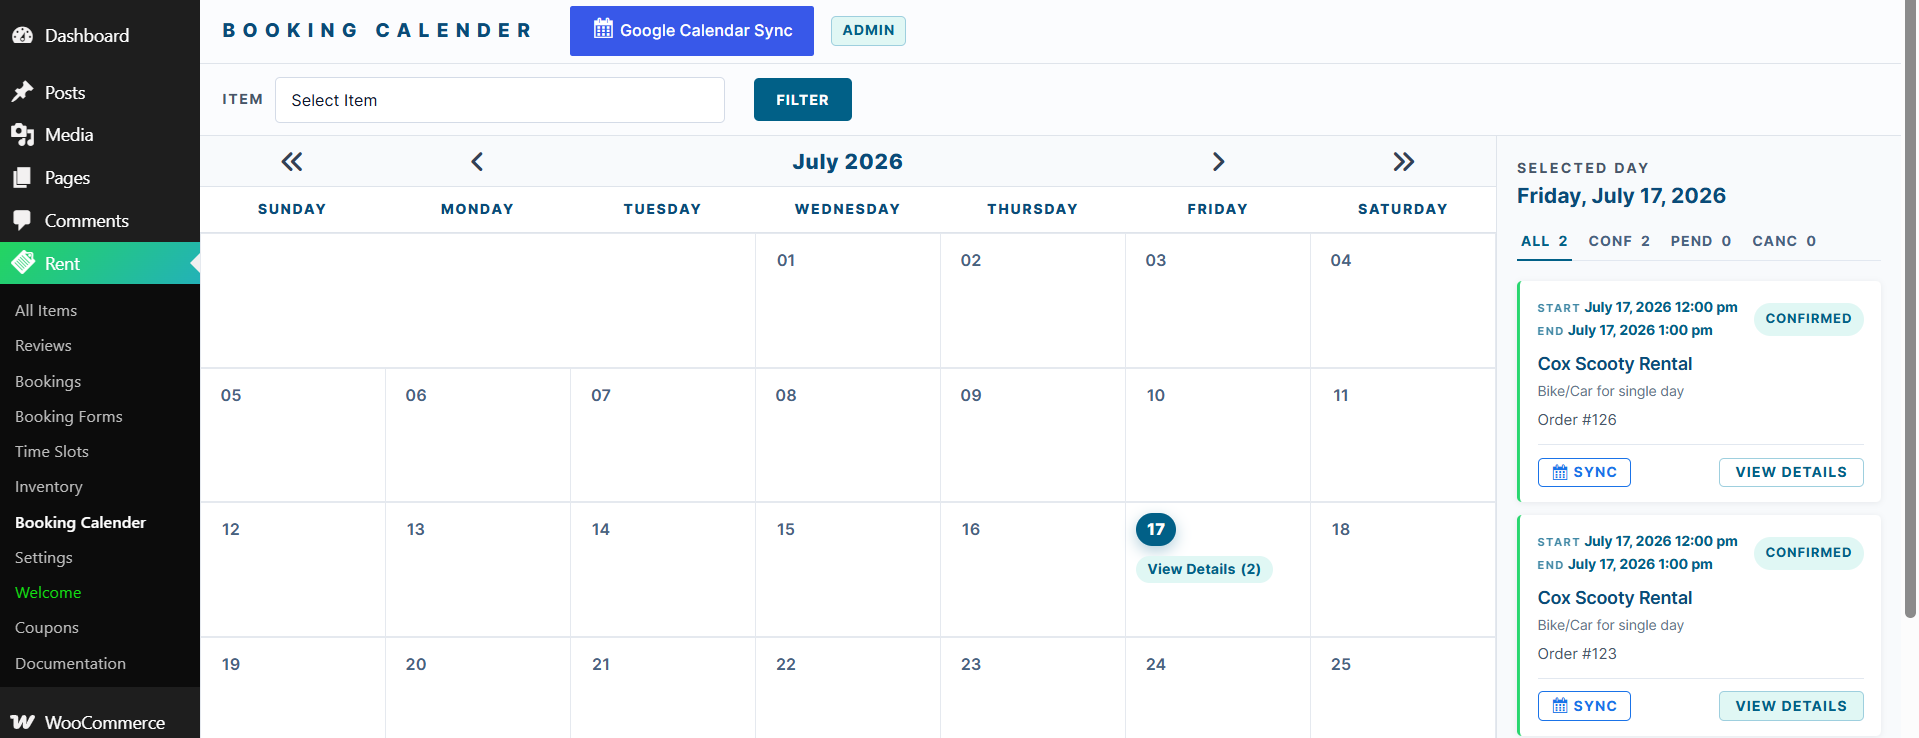
This tool allows you to monitor bookings on a daily, weekly, or monthly basis, ensuring you always know the status of your inventory.
-
Filter & Sync:
- Filter by Item: Use the "Select Item" dropdown and "Filter" button to view bookings for a specific rental item.
- Google Calendar Sync: Click this button to integrate your bookings with your external Google Calendar for better coordination.
-
Calendar View: Navigate through months using the arrow controls. Days with active bookings are highlighted, allowing you to click on them to view the specific rental activity for that date.
-
Selected Day Summary: When you select a specific day (e.g., Friday, July 17, 2026), the sidebar displays:
- Status Counts: A quick summary of All, Confirmed (CONF), Pending (PEND), and Cancelled (CANC) bookings for that day.
- Booking Details: A list of individual bookings (e.g., "Cox Scooty Rental"), including the start/end times, order numbers, and current status.
- Actions: For each booking, you can click SYNC to update external calendars or VIEW DETAILS to manage the specific order.
Inventory

The Inventory dashboard is your central command for monitoring stock levels across all your rental items.
This dashboard provides a real-time overview of your operational capacity.
-
Overview Stats (Top Panel):
- Total Items: The number of items registered in your system.
- In Stock: The total number of items currently available for booking.
- Out of Stock: Items that require a restock.
- Extra Services: The number of additional services currently available.
-
Filtering Options: You can view inventory By Item or By Location. The filter bar allows you to search for inventory data based on specific dates, start times, and end times.
-
Inventory Table: A comprehensive list showing:
- Date & Item Name: The specific date and the name of the rental item.
- Item Stock: Shows the current stock levels (e.g., 18/18 available). Includes icons to view or edit specific item stock details.
- Item Sold Qty: The quantity of items sold for that date.
- Extra Service Stock: Displays stock levels for associated extra services.
- Category Service (Sold Qty): Tracks the sold quantities for categorized services.
Time Slots

The Time Slots panel allows you to configure specific booking intervals for your rental service.
This area enables you to define the precise start and end times available for customers to choose when making a booking.
-
Adding New Time Slots:
- Slot Label: Enter a descriptive name for the time interval (e.g., "Morning").
- Slot Time: Use the time picker to set the exact starting time for this slot.
- Actions: Click Add Time Slot to save your new configuration, Reset to clear the current input fields, or Refresh to reload the list.
-
Time Slot Management Table: This list displays all currently configured intervals, showing the Slot Label (e.g., "12:00 AM"), the corresponding Slot Time, and Action buttons to Edit or Delete existing slots.
Booking Form

The Booking Forms panel is a powerful, drag-and-drop builder designed for creating custom registration forms for your rental items.
Booking
This interface allows you to build tailor-made forms to capture specific information from your customers during the booking process.
-
Form Management:
- All Forms: View and select from your existing forms.
- New Form: Click this button at the top right to start building a fresh registration form from scratch.
-
Form Canvas: The central area where you assemble your form. You can drag and drop fields from the right panel onto the canvas to structure your form, and then drag the fields within the canvas to reorder them.
-
Elements Library (Right Panel): Choose from a variety of input types, including:
- Text & Data: Text Field, Text Area, Date Field, and Number.
- Selection Tools: Checkbox Group, Radio Group, and Select dropdowns.
- Layout Elements: Header and Paragraph for structuring your form content.
-
Saving & Logic: Use the Fields and Logic tabs at the top to switch between building your form layout and defining conditional behavior for those fields. Once you are satisfied with your design, click Save Form to apply your changes.
Booking Tab

The Bookings panel is the central hub for managing all rental transactions within WpRently.
This dashboard provides a comprehensive view of every rental order, whether processed via WooCommerce or a custom checkout flow.
-
Order Overview Stats: Get a quick, high-level snapshot of your business performance:
- Total Orders: The cumulative number of orders processed.
- Total Revenue: The total monetary value generated from all orders.
- Paid Orders: The total count of orders that have been successfully paid.
-
Booking Management Table: This area displays detailed information for every order, including:
- Booking ID: The unique order reference number.
- Customer Details: Name and email address of the customer.
- Rental Item & Period: The item rented and the scheduled time duration.
- Method & Total: The payment method used (e.g., Cash on delivery, WooCommerce) and the order total.
- Date & Status: The date the order was placed and its current status (e.g., Processing, Cancelled).
- Actions: Use the ellipsis menu (...) to manage specific orders.
-
Tools:
- Filter Orders: Expand this section to narrow down your order list by specific criteria.
- Export: Use this button to export your booking data for external reporting or record-keeping.
Configuration
Global Settings

The Global Settings panel is the engine room of your rental site. Use these configurations to tailor the plugin to your specific branding, define how inventory is tracked across orders, and set the user experience for your front-end pages.
Custom Post Type (CPT) Configuration:
- CPT Label & Slug: Customize the internal WordPress dashboard name and URL structure for your rental items.
- CPT Icon: Assign a specific icon (e.g., dashicons-clipboard) to identify the rental management section in your WordPress menu.
Page Management:
- Thank You Page & Search Page: Map the specific pages that display after a payment and where search results appear.
Operational Behavior:
- Count Extra Day Enable: Toggle whether an extra day is treated as a return day.
- Same day booking enable: Control whether customers can book items for the same day.
- Inventory Managed Order Status: Define which order statuses (e.g., Processing, Completed) should trigger inventory management actions.
- Inventory manage based on return: Decide if stock levels should update based on the item's return date.
Display & UX:
- Real-time availability and Instant confirmation Display: Toggle the visibility of these confidence-building indicators on product pages.
- Pricing Info Display: Enable or disable the display of pricing details.
- Enable Share Section: Toggle the social media sharing buttons on individual item pages.
- New Rental List Design: Switch between the new responsive list/table design and the classic WordPress list view.
Style Settings

The Style Settings panel empowers you to align WpRently with your brand’s visual identity. By customizing the colors for your listing pages, booking forms, and individual product detail pages, you create a polished, professional appearance that builds trust with your customers.
This panel allows you to customize the color scheme of your rental pages to match your brand identity, ensuring a cohesive look and feel across your website.
-
Rent List Colors: Configure the Primary and Secondary colors for your rental item listing pages.
-
Rent Booking Page Colors:
- Set the Primary and Secondary colors for the booking interface.
- Customize the Form Background Color to ensure the booking form stands out or blends seamlessly with your theme.
-
Single Page Base Colors: These settings allow you to define a palette of base colors (Color-1, Color-2, Color-3, and Color-6) used across your individual item detail pages. This gives you granular control over elements like buttons, badges, or specific design accents.
Custom CSS

The Custom CSS section offers total design freedom. Use this space to apply advanced styling to your rental interface, allowing you to fine-tune the look of your booking pages to perfectly complement your website's unique design.
Custom CSS Editor: Use this text area to input your own Cascading Style Sheets (CSS) code. This allows you to override default plugin styles, adjust layout spacing, customize element fonts, or add unique design elements to perfectly match your website's theme and branding.
Save Changes: After adding your custom code, be sure to click this button to apply your new styles to the front-end of your site.
Checkout Page

The Checkout Page settings ensure a smooth transition for your customers.
Added to cart redirect to: Choose the page users are sent to immediately after adding an item to their cart (used exclusively in WooCommerce mode).
Standalone Currency Configuration: These settings define how prices are displayed when the plugin is operating without WooCommerce:
- Currency (Standalone): Enter the currency code (e.g., USD, EUR, GBP, BDT).
- Currency Position (Standalone): Select whether the currency symbol appears to the Left (e.g., $99.99) or Right (e.g., 99.99$) of the price.
- Thousand Separator (Standalone): Define the symbol used to separate thousands (e.g., ,).
- Decimal Separator (Standalone): Define the symbol used for decimals (e.g., .).
- Number of Decimals (Standalone): Specify how many decimal places should be shown for prices.
Front-end Display

Use the Front-end Display settings to fine-tune the user experience on your site
This panel controls the branding and text seen by customers on your rental item pages.
-
Badges Configuration:
- Hero Badge: Toggle and customize the "Best Seller" badge displayed on the item's hero image.
- Available Badge: Control the "Available Today" badge in the booking summary, including its text and background/text colors.
- Seller Badge: Toggle and style the "Best Seller" badge specifically for the booking summary.
-
Booking Summary Customization:
- Summary Title: Enable and define the title for the booking summary area (e.g., "Instant Booking Summary").
- Summary Subtitle: Enable and edit the descriptive text appearing under the summary title.
-
Search Form Labels:
- Rental Type Label: Set the placeholder text for the rental-type dropdown in your search forms.
- Pickup Location Label: Define the label for the location selection dropdown in your search forms.
PDF Settings

The PDF Settings ensure your business provides professional, branded documentation for every booking.
This area controls the design and content of the PDF tickets sent to customers upon booking confirmation.
-
Ticket & Receipt Configuration:
- Send Ticket: Toggle "Yes" to automatically attach a PDF ticket to the booking confirmation email.
- Thermal Receipt Width: Choose the roll width (e.g., 80mm) for thermal (POS) receipts exported from your order list.
-
Branding & Visuals:
- Logo & Background: Upload your company logo and a background image for the PDF ticket to ensure it aligns with your brand.
- PDF Background & Text Color: Use the color selectors to define the body background and text colors for your PDF tickets, ensuring high readability and branded design.
-
Company & Legal Information:
- Company Details: Enter your company address and phone number to be displayed on the ticket.
- Terms & Conditions: Define a title and the full text for your Terms and Conditions, which will be automatically included in the PDF footer.
Email Settings

Email Settings Explained
This area is divided into general WooCommerce-integrated notifications and specific settings for your custom standalone checkout flow.
-
General Order Emails:
- Send Email on: Select the order statuses (Processing or Completed) that trigger an automatic email containing the PDF ticket as an attachment.
- Email Customization: Define the Email Subject, Email Content (using the visual editor to add media), Email From Name, and Email From address.
-
Standalone / Custom Payment Booking Emails: These settings control notifications for bookings made outside of the standard WooCommerce checkout flow.
- Standalone Booking Emails: Enable or disable these confirmation emails.
- PDF Attachment: Choose whether to attach the PDF ticket to these standalone emails.
- Admin Notification: Specify the Admin Notification Email address where new booking notices should be sent.
- Customer Communication: Customize the Customer Email Subject and Email Content, supporting placeholders like
{customer_name}. - Admin Communication: Customize the Admin Email Subject and Email Content to tailor the internal notifications you receive when a new booking is placed.
Review Settings
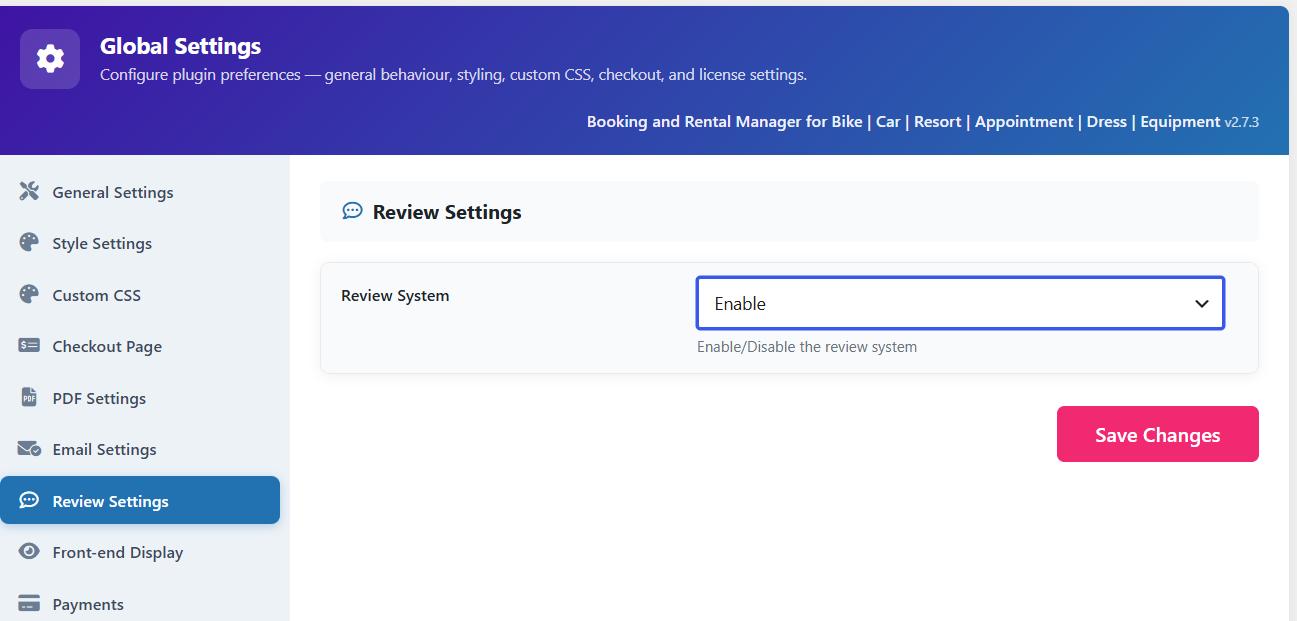
The Review Settings panel allows you to manage customer feedback directly within your rental system.
Review Settings Explained
- Review System: This simple toggle allows you to enable or disable the review system for your rental items. When enabled, this feature encourages customer engagement and helps build trust by allowing users to share their experiences and rate your services.
Payments
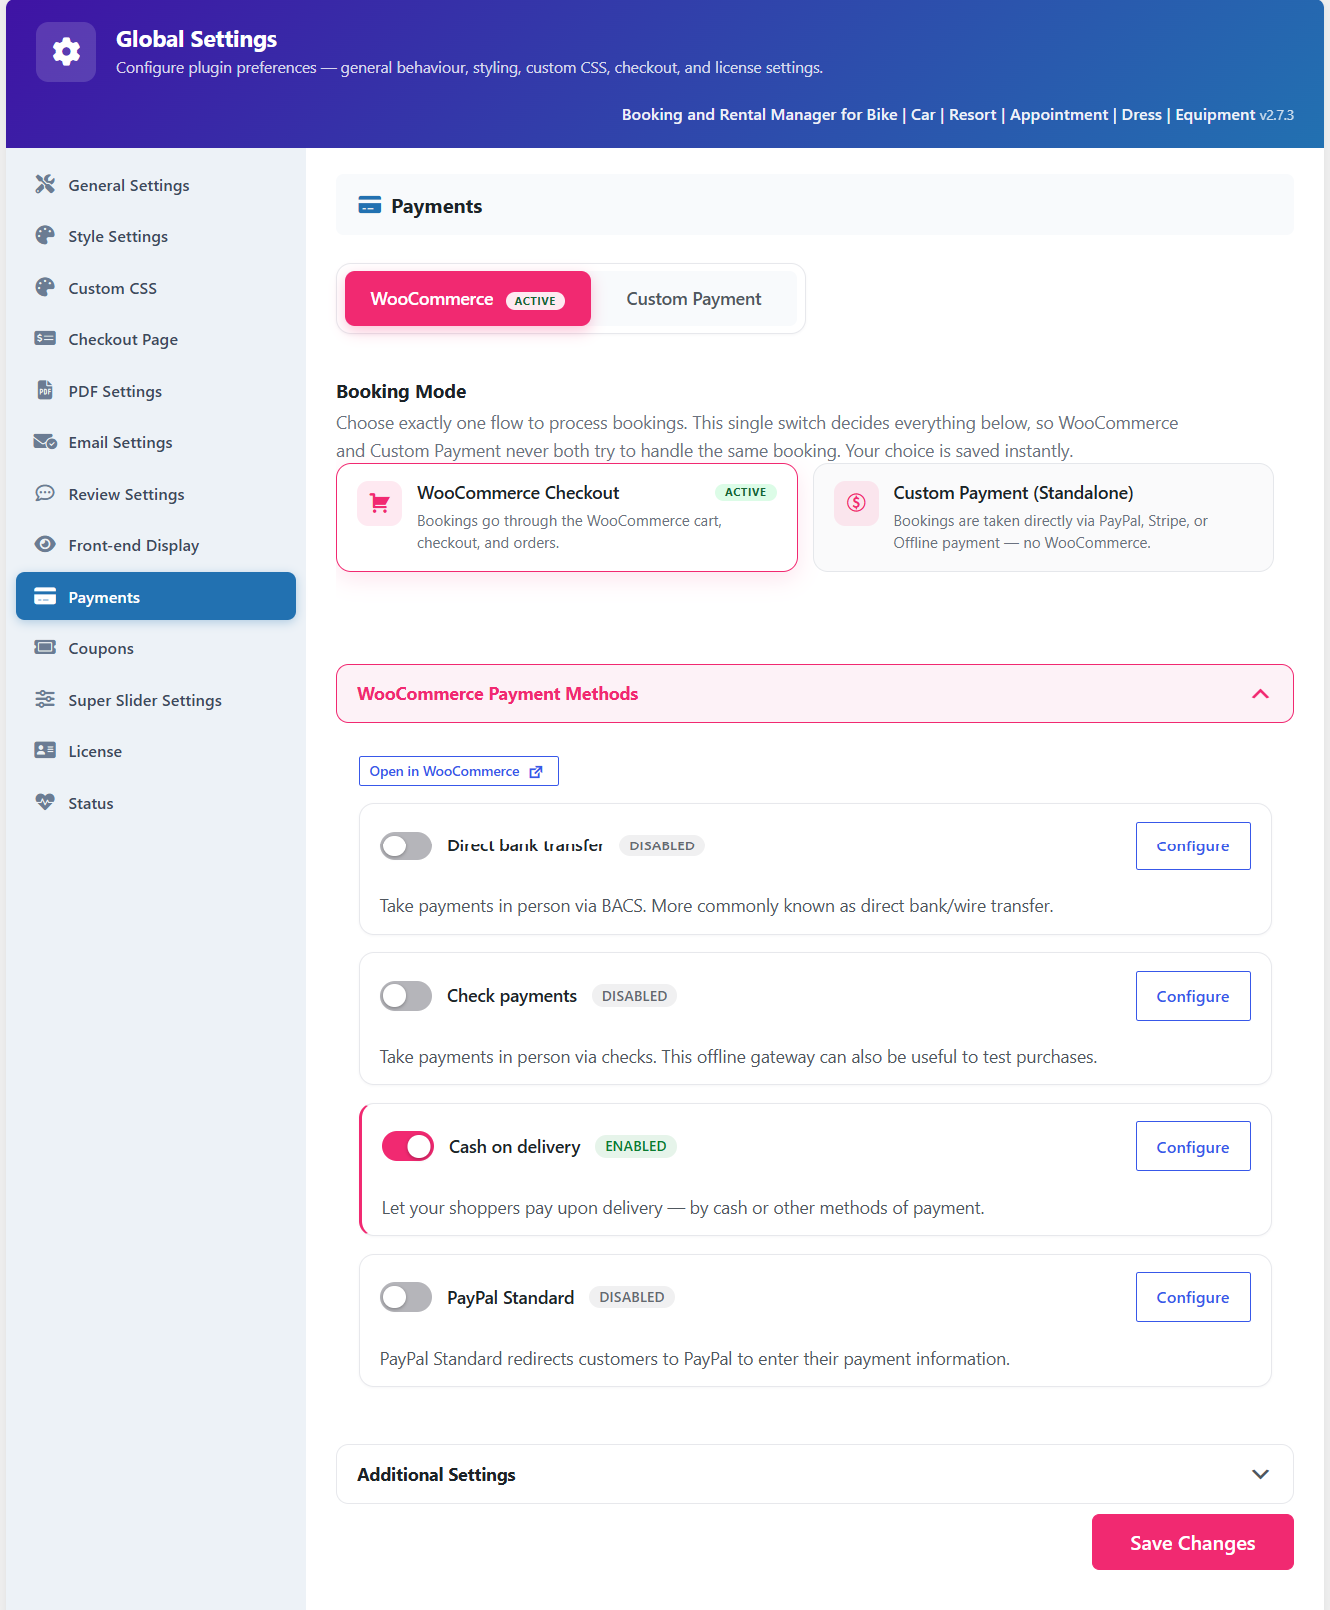
The Payments panel is the central hub for configuring how your business processes booking transactions. Here is how you can document this for your users:
This area allows you to choose your primary transaction workflow and configure specific payment gateways.
-
Booking Mode: This is the most critical setting, as it defines your entire payment flow. You must choose exactly one:
- WooCommerce Checkout (Active): All bookings are processed through the standard WooCommerce cart, checkout, and order management systems.
- Custom Payment (Standalone): Bookings are processed directly via methods like PayPal, Stripe, or Offline payment, bypassing WooCommerce entirely.
-
WooCommerce Payment Methods: When in WooCommerce mode, this section provides direct access to your enabled gateways.
- You can see the status (Enabled/Disabled) of various methods like Direct bank transfer, Check payments, Cash on delivery, and PayPal Standard.
- Use the Configure buttons to adjust settings for each gateway, or click Open in WooCommerce to manage your primary payment configuration within the main WooCommerce settings panel.

When operating in Custom Payment (Standalone) mode, you have complete control over your payment gateways without the overhead of WooCommerce. Use this setup to directly configure PayPal, Stripe, or Offline Payment options, and leverage the Require Account Login toggle to manage whether you allow guest checkouts on your platform.
Custom Payment Gateway Configuration
-
Custom Payment Gateways: You can configure and enable specific payment methods to accept funds directly.
- PayPal: Accepts payments via PayPal balance and cards.
- Stripe: Processes credit and debit card payments.
- Offline Payment: Facilitates payments via bank transfer, cash, or "pay on pickup" methods.
- Each gateway includes a Configure button to set up its specific credentials and options.
-
Additional Checkout Settings:
- Require Account Login: When toggled on, this forces customers to log in or register before they can complete a booking. If toggled off, guest checkout is permitted, and customers can track their bookings using their email and reference number.
- Booking Confirmation Page: Allows you to select a dedicated page to display to customers immediately after they successfully complete a booking in standalone mode.
Coupons
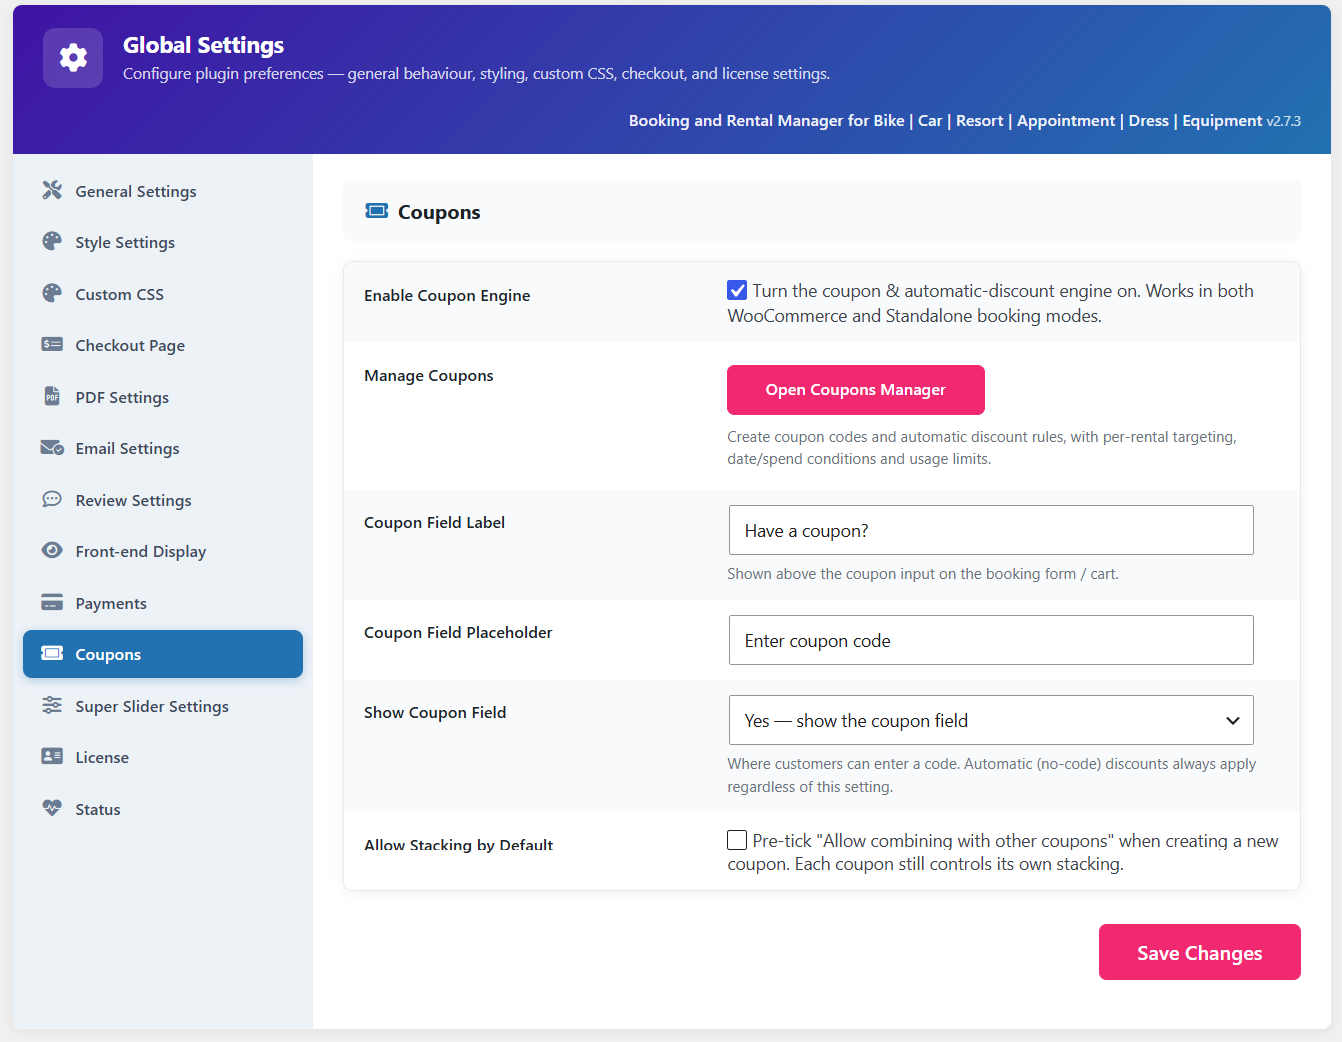
This panel controls your discount engine, allowing you to manage how customers interact with promotions.
-
Coupon Engine:
- Enable Coupon Engine: Toggle this on to activate both manual coupon codes and automatic discount rules.
- Manage Coupons: Click Open Coupons Manager to create specific codes and automatic rules based on targeting, spend conditions, and usage limits.
-
Front-end Display:
- Coupon Field Label & Placeholder: Customize the text shown above the coupon input field and the placeholder text inside the input field on your booking forms/cart.
- Show Coupon Field: Choose whether to display the manual entry field to customers. Note that automatic discounts will still apply even if this field is hidden.
-
Stacking Behavior:
- Allow Stacking by Default: Toggle this to automatically check the "Allow combining with other coupons" option when creating new coupons, though individual coupon settings can still override this.
Super Slider settings

The Super Slider Settings panel allows you to configure the visual presentation of image sliders for your rental items.
This area controls the functionality and appearance of your rental item galleries.
-
Slider Configuration:
- Slider Type & Style: Choose your preferred slider type and design style (e.g., "Slider," "Style One") to match your website's layout.
- Slider Indicator: Toggle the visibility of slider indicators and select their type (e.g., "Icon Indicator").
- Slider Showcase: Toggle the visibility of the "Slider Showcase" feature and set its position (e.g., "At Right Position").
-
Popup & Height Settings:
- Popup Indicators: Enable or disable image and icon indicators for slider popups.
- Slider Height: Select the preferred height (e.g., "Average") for your sliders to ensure they fit seamlessly within your page design.
License Settings
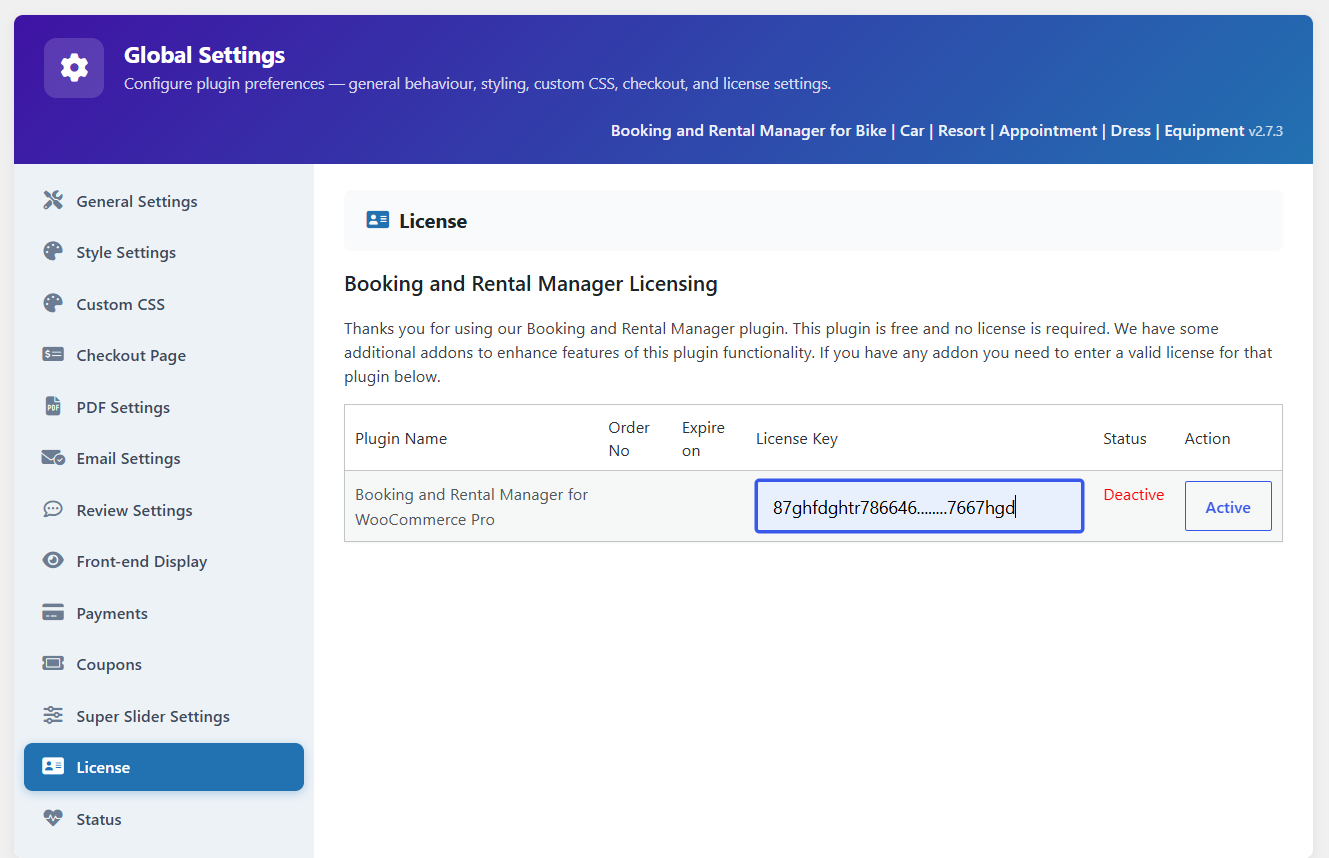
The License panel is where you manage product keys for premium add-ons to the core plugin.
Plugin Licensing: While the base Booking and Rental Manager plugin is free and does not require a license, any premium add-ons you purchase will require activation.
- Activation Process: To activate an add-on, locate its entry in the list (e.g., "Booking and Rental Manager for WooCommerce Pro"), input your valid License Key into the provided field, and click the Active button to complete the activation.
- Management: This screen provides a clear view of your licensed plugins, including their Order No, Expire on date, and current Status (Active/Deactive).
Status

Status Settings Explained
-
Required Plugins: This section confirms the status of third-party plugins essential for full functionality.
- WooCommerce: Confirms if it is activated for booking, payment, and order management.
- MagePeople PDF Support: Confirms if it is activated for generating PDF booking receipts and email attachments.
-
Server Environment: This is a vital diagnostic area, especially when contacting support to troubleshoot issues. It displays technical details including:
- Plugin Version, PHP Version, and PHP Memory Limit.
- Max Upload Size, Max Execution Time, and WordPress Version.
- Database Version, Server Software, Active Theme, WooCommerce Version, and Multisite status.